CHS Web Design Track

Getting Started with CSS: CSS Styles and Colors

<< Previous Lesson | Next Lesson >>

Session 3.3 Visual Overview: Layout with Positioning Styles

The CSS positioning Styles

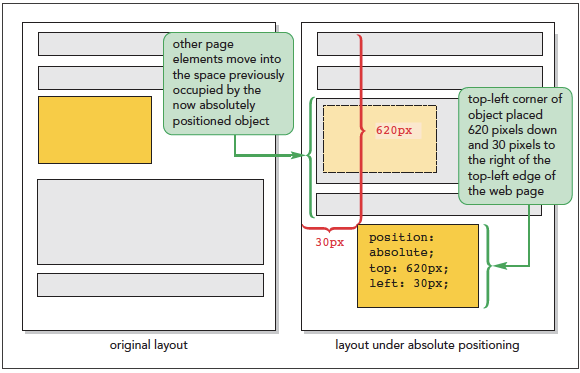
  • To place an element at a specific position within its container, use
    position: type;
    top: value;
    right: value;
    bottom: value;
    left: value;
    where type indicates the kind of positioning applied to the element and top, right, bottom, and left properties indicate the coordinates of the element
Static positioning –
The element is placed where it would have fallen naturally within the flow of the document
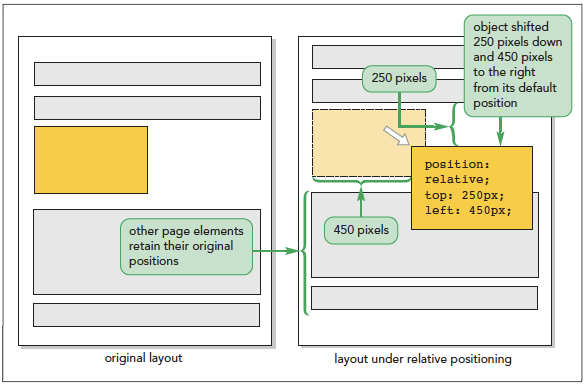
Relative positioning –
The element is moved out of its normal position in the document flow
Absolute positioning –
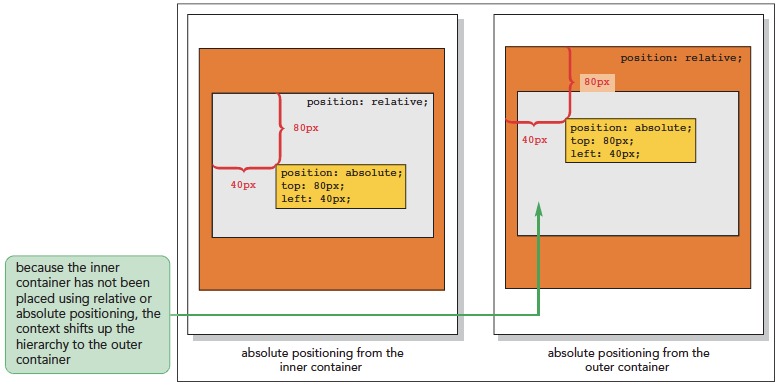
The element is placed at specific coordinates within containers

Fixed and Inherited Positioning

Fixed positioning –
Fixes an object within a browser window to avoids its movement
Inherited positioning –
Allows an element to inherit the position value of its parent element

Using the Positioning Styles

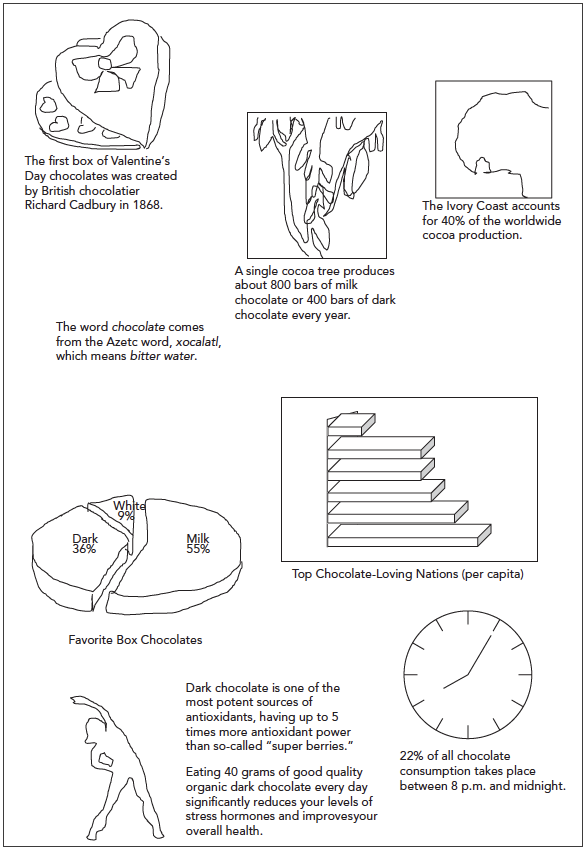
Figure 3-49 Proposed layout of the chocolate infographic
To open the infographic file:
  1. Use your editor to open the pc_info_txt.html file from the html03 > tutorial folder. Enter your name and the date in the comment section of the file and save the document as pc_info.html.
  2. Directly after the title element, insert the following link elements to attach the file to the pc_reset.css, pc_styles3.css, and pc_info.css style sheets.
    <link href=”pc_reset.css” rel=”stylesheet” />
                    <link href=”pc_styles3.css” rel=”stylesheet” />
                    <link href=”pc_info.css” rel=”stylesheet” />
  3. Take some time to study the structure and content of the pc_info.html document. Note that Anne has placed eight information graphics, each within a separate div element with a class name of infobox and an id name ranging from info1 to info8.
  4. Close the file, saving your changes.
To format the main element:
  1. Use your editor to open the pc_info_txt.css file from the html03 > tutorial folder. Enter your name and the date in the comment section of the file and save the document as pc_info.css.
  2. Go to the Main Styles section and insert the following style rule to format the appearance of the main element:
    main {
    position: relative;
    height: 1400px;
    width: 100%;
    }

    It will be easier to see the effect of placing the different div elements if they are not displayed until you are ready to position them. Add a rule to hide the div elements, then as you position each element, you can add a style rule to redisplay it.

  3. Directly before the Main Styles section, insert the following style rule to hide all of the infoboxes:
    div.infobox {display:none;}
  4. Save your changes to the file and then open the pc_info.html file in your browser. Verify that the browser shows an empty box, about 1400 pixels high, where the infographic will be placed.
Figure 3-50 highlights the newly added code in the style sheet.
To position the information boxes:
  1. Return to the pc_info.css file in your editor and scroll down to the Infographic Styles section.
  2. Add the following style rule to set the position type of all of the information boxes.
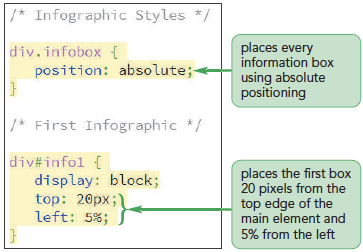
    div.infobox {
    position: absolute;
    }
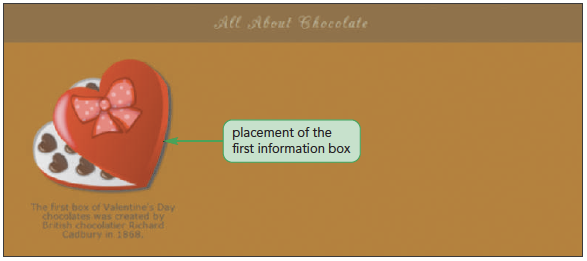
  3. Position the first information box 20 pixels from the top edge of its container and 5% from the left edge.
    div#info1 {
    display: block;
    top: 20px;
    left: 5%;
    }

    Note that we set the display property to block so that the first information box is no longer hidden on the page.

  4. Save your changes to the file and then reload the pc_info.html file in your browser.
Figure 3-51 highlights the style rules for all of the information boxes and the placement of the first inf ormation box.
Figure 3-52 shows the placement of the first information box.
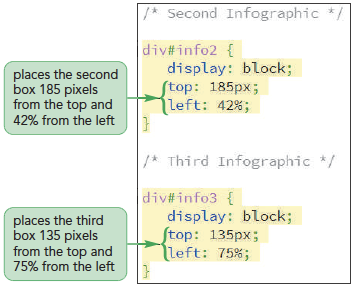
To place the next two boxes:
  1. Return to the pc_info.css file in your editor and go to the Second Infographic section.
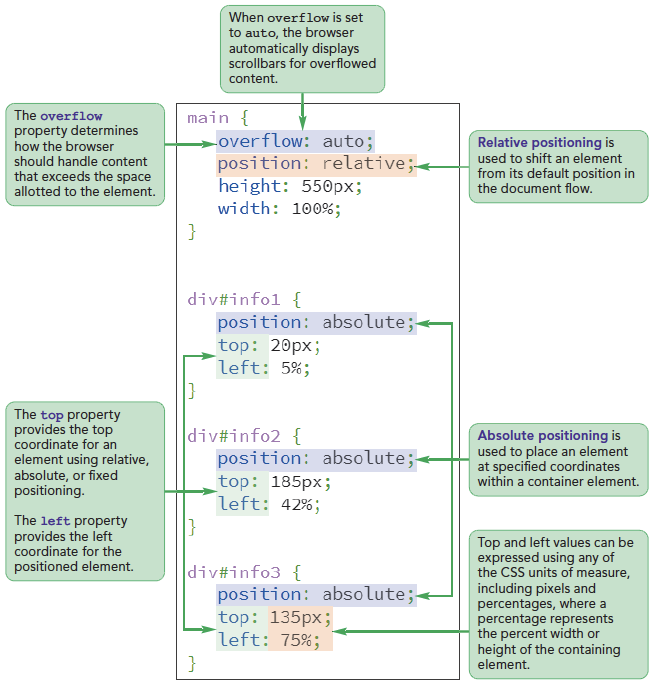
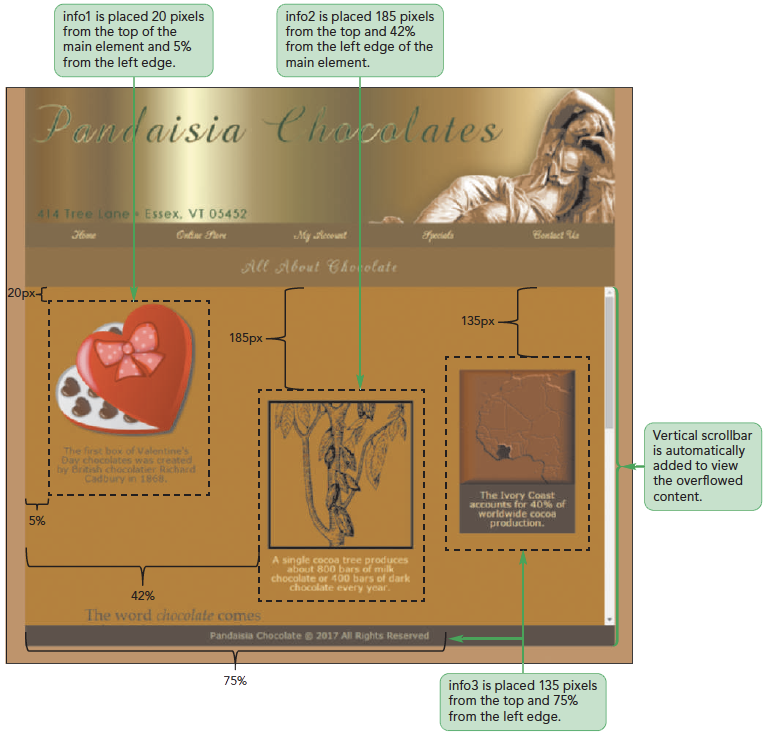
  2. Add the following style rule to place the second box 185 pixels down from the top of the container and 42% from the left edge.
    div#info2 {
    display: block;
    top: 185px;
    left: 42%;
    }
  3. Within the Third Infographic section insert the following style rule to place the third box 135 pixels from the top edge and 75% of the width of its container from the left edge.
    div#info3 {
    display: block;
    top: 135px;
    left: 75%;
    }
  4. Save your changes to the file and reload pc_info.html in your browser.
Figure 3-53 highlights the style rules to position the second and third information boxes.
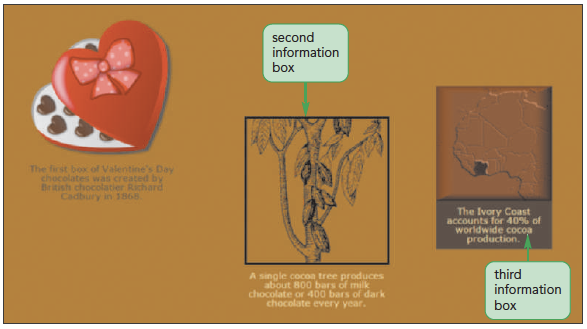
Figure 3-54 shows the placement of the first three information boxes.
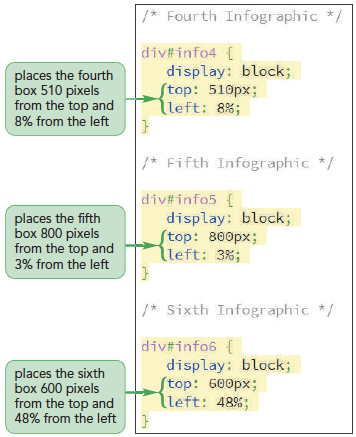
To place the next three boxes:
  1. Return to the pc_info.css file in your editor, go to the Fourth Infographic section and place the fourth box 510 pixels from the top edge and 8% from the left edge.
    div#info4 {
    display: block;
    top: 510px;
    left: 8%;
    }
  2. Add the following style rule to the Fifth Infographic section to position the fifth box:
    div#info5 {
    display: block;
    top: 800px;
    left: 3%;
    }
  3. Add the following style rule to the Sixth Infographic section to position the sixth box:
    div#info6 {
    display: block;
    top: 600px;
    left: 48%;
    }
  4. Save your changes to the file and reload pc_info.html in your browser.
Figure 3-55 highlights the positioning styles for the fourth, fifth, and sixth information boxes.
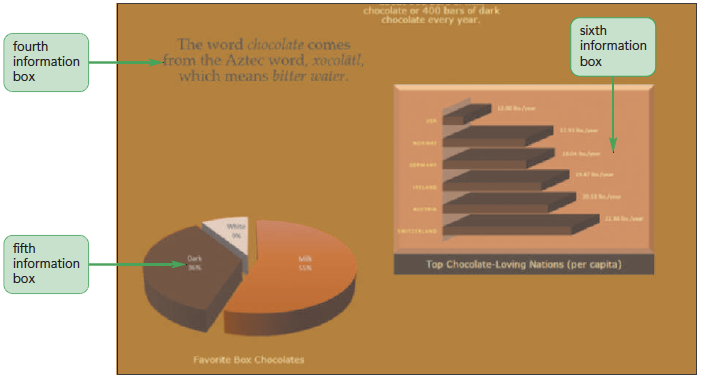
Figure 3-56 shows the revised layout of the infographic.
To place the last two boxes:
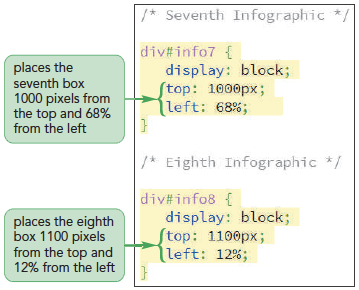
  1. Return to the pc_info.css file in your editor, go to the Seventh Infographic section and insert the following style rules:
    div#info7 {
                    display: block;
                    top: 1000px;
                    left: 68%;
                    }
  2. Add the following style rules to the Eighth Infographic section:
    div#info8 {
                    display: block;
                    top: 1100px;
                    left: 12%;
                    }
  3. Scroll up to before the Main Styles section and delete the style rule div.infobox {display: none;} because you no longer need to hide any information boxes.
  4. Save your changes to the file and reload pc_info.html in your browser.
Figure 3-57 highlights the style rules for the seventh and eighth information boxes.
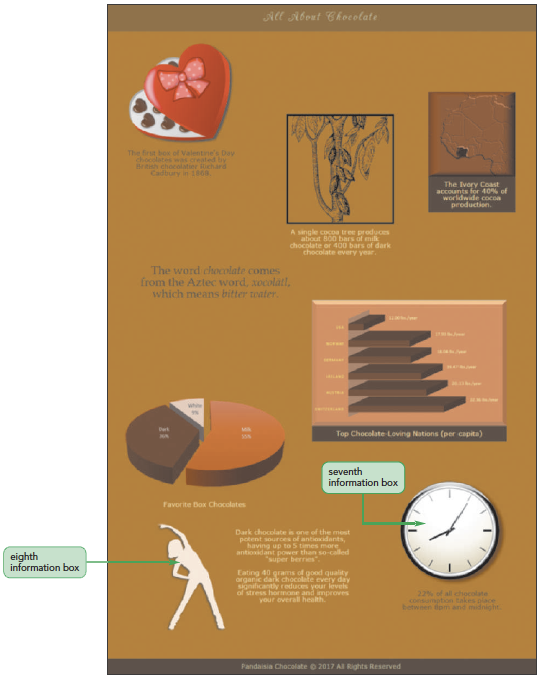
Figure 3-58 show the complete layout of the eight boxes in the infographic.
Class Discussion:

Discuss the problems one faces while using grids.

Quick Quiz:
  1. To fix an object within the browser window so that it doesn't scroll, the position property must be set to _____ .
  2. Which positioning property is the same as not using any CSS positioning at all?
Class Discussion:

Positioning gives you a great deal of control over how your web pages look. Do some websites overuse positioning? Would the you like a website that is filled with eye-popping boxes of text or something that flows in a more linear style? Debate the pros and cons of excess positioning. Show an example of a website that has excess of positioning styles.

Handling Overflow

Overflow
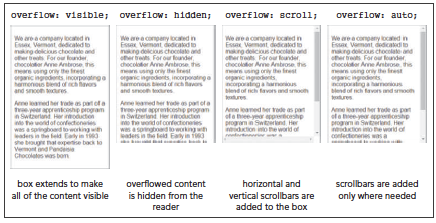
Controls a browser that handles excess content
overflow: type;
where type is visible (the default), hidden, scroll, or auto
visible
Instructs browsers to increase the height of an element to fit overflow contents
hidden
Keeps an element at the specified height and width, but cuts off excess content
scroll
Keeps an element at the specified dimensions, but adds horizontal and vertical scroll bars
auto
Keeps an element at the specified size, adding scroll bars when they are needed
  • CSS3 provides the overflow-x and overflow-y properties to handle overflow specially in the horizontal and vertical directions
To apply the overflow property:
  1. Return to the pc_info.css file in your editor and go to the Main Styles section.
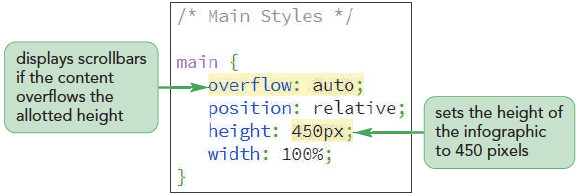
  2. Within the style rule for the main selector, insert the property overflow: auto;.
  3. Reduce the height of the element from 1400px to 450px.
  4. Close the file, saving your changes.
  5. Reload the pc_info.html file in your browser.
  6. Close any open files now.
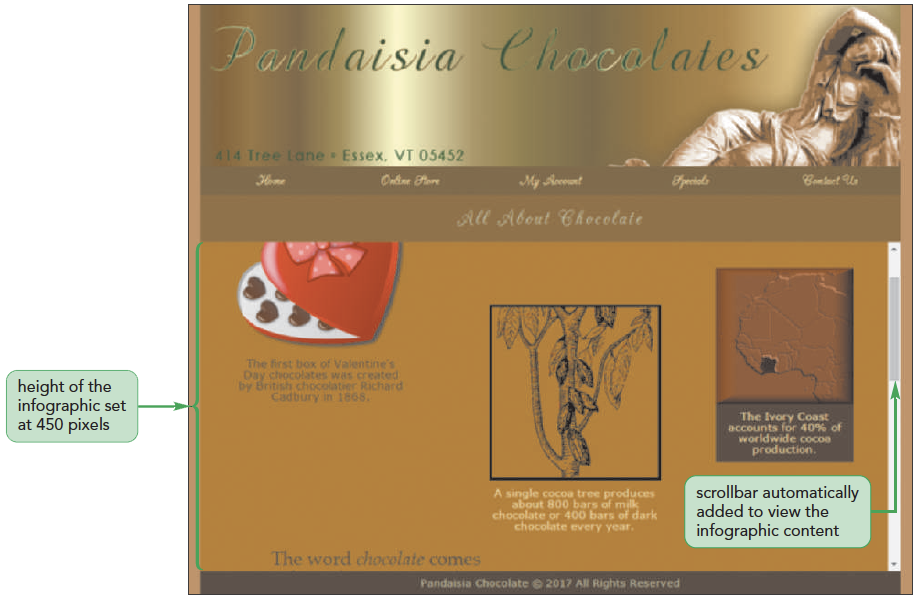
Figure 3-60 highlights the revised code in the style rule.
As shown in Figure 3-61, the height of the infographic has been reduced to 450 pixels and scrollbars have been added that you can use to view the entire infographic.
Quick Quiz:
  1. Which overflow property is browser default?
  2. Which type of overflow property adds scroll bars only as they are needed?
Class Discussion:

Come up with instances when you might want to crop an image on a web page rather than display the whole picture. Can they think of why they might want to crop it on the web page rather than using a photo editor? Have a discussion with students on how to handle overflow in horizontal and vertical directions.

Clipping an Element

Clip –
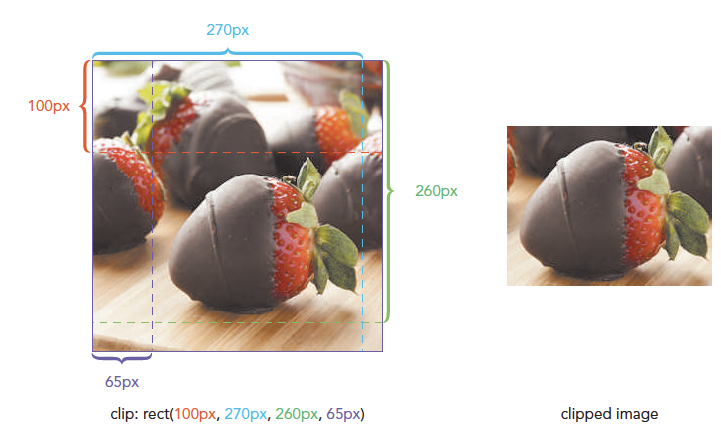
Defines a rectangular region through which an element's content can be viewed
  • Anything that lies outside the boundary of the rectangle is hidden
  • The syntax of the clip property is
    clip: rect(top, right, bottom,left);
    where top, right, bottom, and left define the coordinates of the clipping rectangle
Quick Quiz:
  1. True/ False: clip: auto. This code is used to remove clipping completely.
  2. True/False: Clipping can only be applied when the object is placed using relative positioning.

Stacking elements

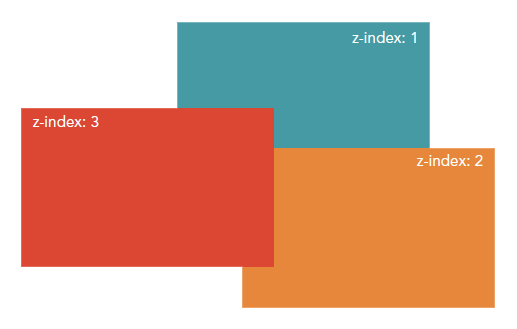
  • By default, elements that are loaded later by a browser are displayed on top of elements that are loaded earlier
  • To specify different stacking order, use the following z-index property:
    z-index: value;
    where value is a positive or negative integer, or the keyword auto
  • The z-index property works only for elements that are placed with absolute positioning
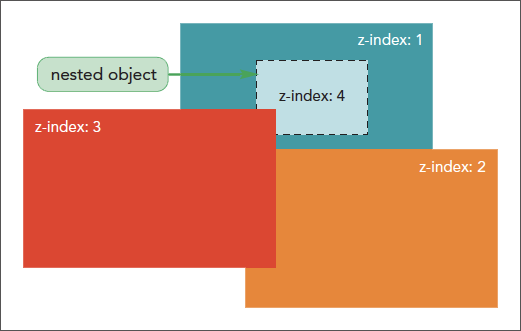
  • An element's z-index value determines its position relative only to other elements that share a common parent
Quick Quiz:
  1. True/False: To alter the default stacking order, use the z-index style.
  2. True/False: z-index property works for all the elements, regardless of the type of positioning.
Class Discussion

Share ways you might layer items on a page using the z-index.

Session 3.3 Quick Check
  1. What is the difference between relative positioning and absolute positioning?
  2. Provide a style rule to shift the aside element 5% to the right and 10% down from its default position in the document flow.
  3. Provide a style rule to place the div element with the id graph1 50 pixels to the right and 15 pixels down from the top-left corner of its container element.
  4. What must be true about a container element to have objects positioned absolutely within it?
  5. Provide a style rule to set the height of a navigation list with the id nav1 to 300 pixels but to be displayed with a scrollbar if there are too many entries to fit within the navigation list's boundaries.
  6. An inline image with the id logo_img is 400 pixels wide by 300 pixels high. Provide a style rule to clip this image by 10 pixels on each edge.
  7. One element has a z-index value of 1; a second element has a z-index value of 5. Will the second element always be displayed on top of the first? Explain why or why not.
<< Previous Lesson | Next Lesson >>