CHS Web Design Track

HTML5 and CSS3 7th Edition

Tutorial 4 Graphic Design with CSS

«Previous Lesson | Next Lesson »
Materials

Creating Figure Boxes

To create a figure box:
  1. Use your editor to open the tb_komatsu_txt.html file from the html04 > tutorial folder. Enter your name and the date in the comment section of the file and save it as tb_komatsu.html. For this web page, you’ll work with a new style sheet named tb_visual1.css. Kevin has already created a reset style sheet and a typographical style sheet in the tb_reset.css and tb_styles1.css files respectively.
  2. Within the document head, insert the following link elements to link the page to the tb_reset.css, tb_styles1.css, and tb_visual1.css style sheet files.
    <link href=”tb_reset.css” rel=”stylesheet” />
    <link href=”tb_styles1.css” rel=”stylesheet” />
    <link href=”tb_visual1.css” rel=”stylesheet” />
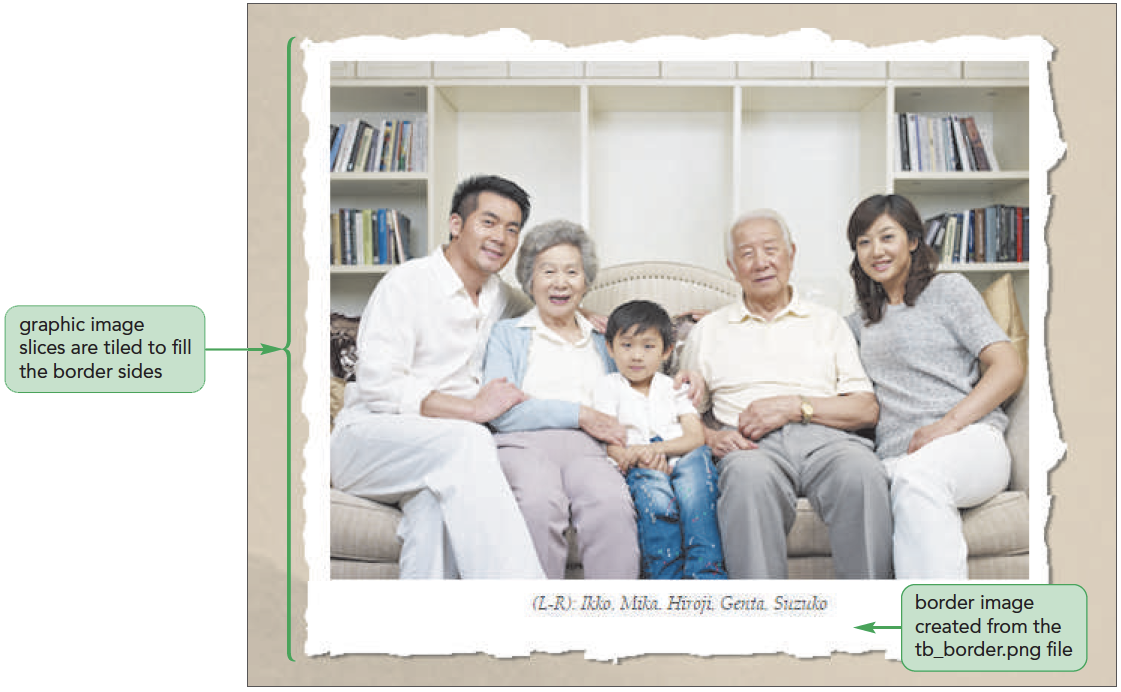
  3. Scroll down to the article element and, directly after the h1 element, insert the following code for the figure box displaying the Komatsu family portrait.
    <figure>
        <img src=”tb_komatsu.png” alt=”family portrait” />
        <figcaption>(L-R): Ikko, Mika, Hiroji, Genta, Suzuko</figcaption>
    </figure>
  4. Take some time to review the content and structure of the rest of the document and then save your changes to the file.
Figure 4-1 highlights the code for the family portrait figure box.
 
To format and view the figure box:
  1. Use your editor to open the tb_visual1_txt.css files from the html04 > tutorial folder. Enter your name and the date in the comment section of the file and save it as tb_visual1.css.
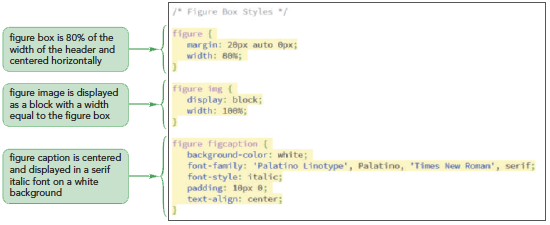
  2. Scroll down to the Figure Box Styles section at the bottom the document and insert the following style rule for the figure element:
    figure {
    margin: 20px auto 0px;
    width: 80%;
    }
  3. Add the following style to format the appearance of the image within the figure box:
    figure img {
    display: block;
    width: 100%;
    }
  4. Finally, insert the following rule for the figure caption:
    figure figcaption {
    background-color: white;
    font-family: 'Palatino Linotype', Palatino,
    'Times New Roman', serif;
    font-style: italic;
    padding: 10px 0;
    text-align: center;
    }
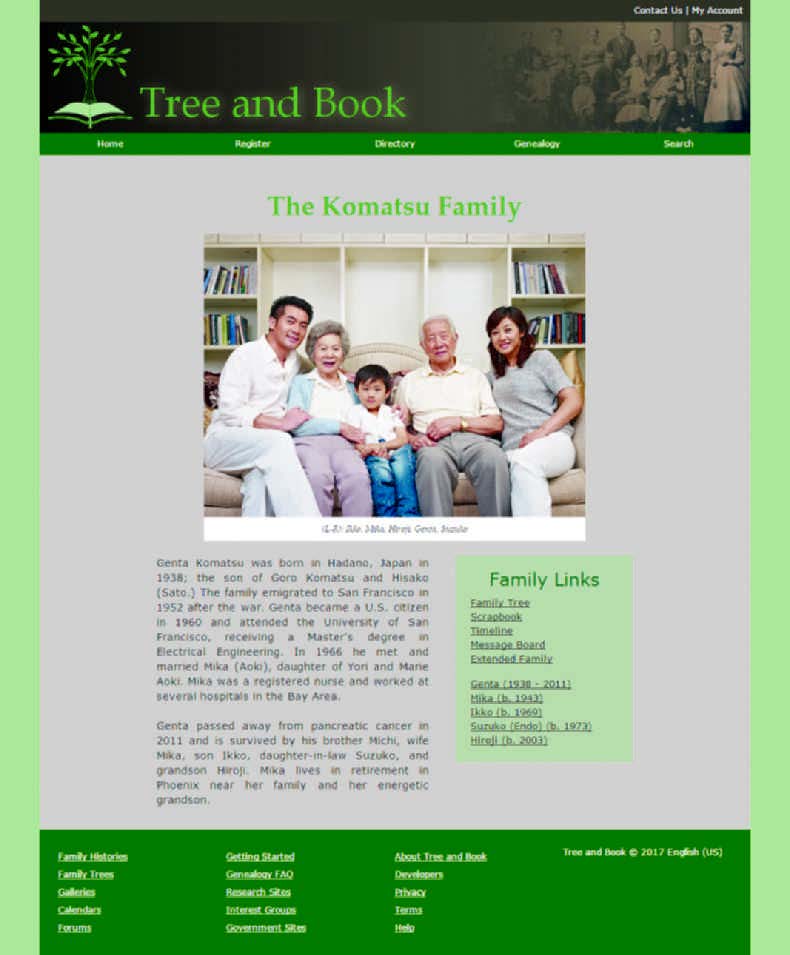
  5. Save your changes to the file and then open the tb_komatsu.html file in your browser. Figure 4-3 shows the initial appearance of the page.
 

Quick Quiz:

  1. True/False: The figcaption element in HTML is optional.
  2. True/False: The figure element doesn't support text excerpts.

Exploring Background Styles

Tiling a Background Image

Tiling
‐ The process of repeating an image both vertically and horizontally until the background is filled
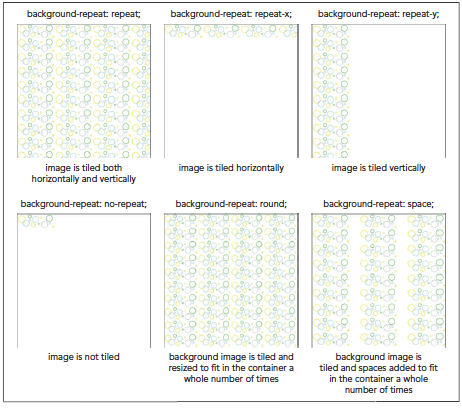
  • The type of tiling can be specified by applying the following background-repeat style:
    background-repeat: type;
    where type can be repeat (the default), repeat-x, repeat-y, round, or space

Attaching the Background Image

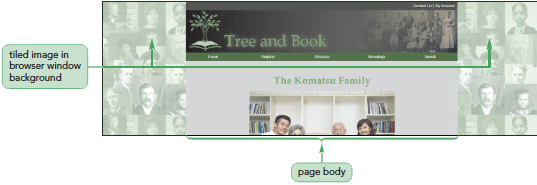
To add a background image to the browser window:
  1. Return to the tb_visual1.css file in your editor.
  2. Go to the HTML Styles section and add the following style rule to change the background of the browser window:
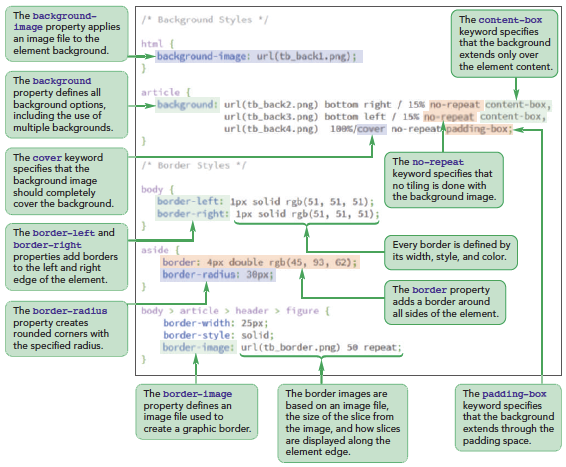
    html {
    background-image: url(tb_back1.png);
    }
    Note that because you are using the default setting for tiling the background image, you do not need to include the background-repeat style rule. Figure 4-5 highlights the new style rule.
  3. Save your changes to the file and then reload tb_komatsu.html in your browser. Figure 4-6 shows the tiled background in the browser window.

Setting the Background Image Position

Defining the Extent of the Background

Sizing and Clipping an Image

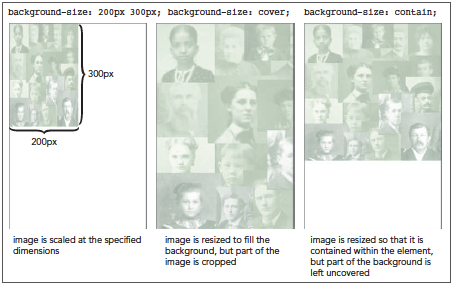
  • By default, the size of a background image equals the size stored in its image file
  • This size can be changed by using the following property:
    background-size: width height;
    where width and height can be specified in pixels or by using the keywords auto, cover, and contain
Examples of background-size types

The background Property

To add a background image to the page article:
  1. Return to the tb_visual1.css file in your editor and scroll down to the Article Styles section.
  2. Add the following style rule:
    article {
    background: url(tb_back2.png) bottom right / 15%
    no-repeat content-box;
    }
  3. Save your changes and then reload tb_komatsu.html in your browser.
Figure 4-8 highlights the style rule applied to the page article.
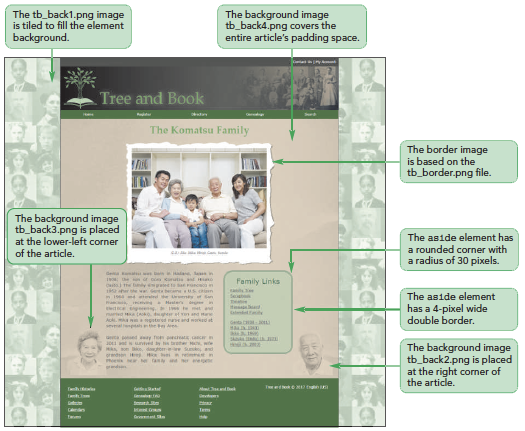
Figure 4-9 shows the placement of the background image.
 

Adding Multiple Backgrounds

To add a background image to the page article:
  1. Return to the tb_visual1.css file in your editor and return to the Article Styles section.
  2. Type a comma after the first background listed for the article element and before the semicolon (;), then press Enter.
  3. Be sure the insertion point is before the semicolon (;), then add the following code to display two more background images followed by a background color:
    url(tb_back3.png) bottom left/15% no-repeat content-box,
    url(tb_back4.png) 100%/cover no-repeat,
    rgb(211, 211, 211)

    The background color acts as a fallback design element and will not be displayed except for browsers that are incapable of displaying background images.

    Trouble? Be sure your code matches the code in Figure 4-10, including the commas used to separate the components in the list and the ending semicolon.

  4. Save your changes and then reload tb_komatsu.html in your browser.
Figure 4-10 displays the code for the multiple backgrounds applied to the page article.
Figure 4-11 shows the three background images displayed with the article.
 

Quick Quiz:

  1. True/ False: By default, the element's background is defined to extend only through the padding space.
  2. Which background-attachment type is used to create watermarks?
 

Class Discussion:

What are your views on multiple backgrounds? List out the advantages and disadvantages of having multiple backgrounds.


Working with Borders

Setting Border Width and Color

Setting the Border Design

  • The appearance of borders can be further defined by using the following style:
    border-side-style: style;
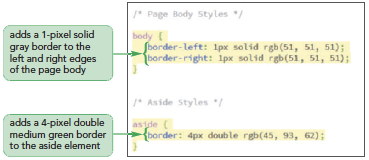
To add borders to the page elements:
  1. Return to the tb_visual1.css file in your editor and go to the Page Body Styles section.
  2. Add the following style rule for the page body:
    body {
    border-left: 1px solid rgb(51, 51, 51);
    border-right: 1px solid rgb(51, 51, 51);
    }
  3. Go to the Aside Styles section and add the following style rule for the aside element:
    aside {
    border: 4px double rgb(45, 93, 62);
    }
  4. Save your changes to the file and then reload tb_komatsu.html in your browser.
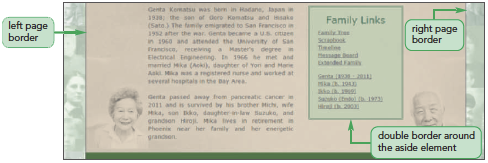
Figure 4-13 highlights the style rules that create borders for the page body and aside element.
Figure 4-14 shows the appearance of the page with the newly added borders. Note that the background color and other styles associated with the aside element are in the tb_styles1.css file.

Class Discussion:

Research how the syntax for the Mozilla extension does not match the syntax for the WebKit extension or for the final CSS3 specification. Prepare a list of the border styles supported in their browsers.

Creating Rounded Corners

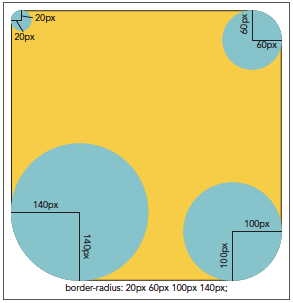
  • Any of the four corners of a border can be rounded off by applying the following property:
    border-radius: top-left top-right bottom-right bottom-left;
    where top-left, top-right, bottom-right, and bottom-left are the radii of the individual corners
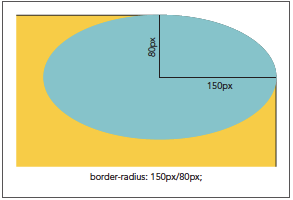
  • Corners do not need to be circular
  • Elongated or elliptical corners are created by specifying the ratio of the horizontal radius to the vertical radius using the style:
    border-radius: horizontal/vertical; 
    where horizontal is the horizontal radius of the corner and vertical is the vertical radius of the same corner
To add rounded corners to an element:
  1. Return to the tb_visual1.css file in your editor and go to the Aside Styles section.
  2. Add the following style to the style rule for the aside element:
    border-radius: 30px;
  3. Save your changes to the file and reload tb_komatsu.html in your browser.
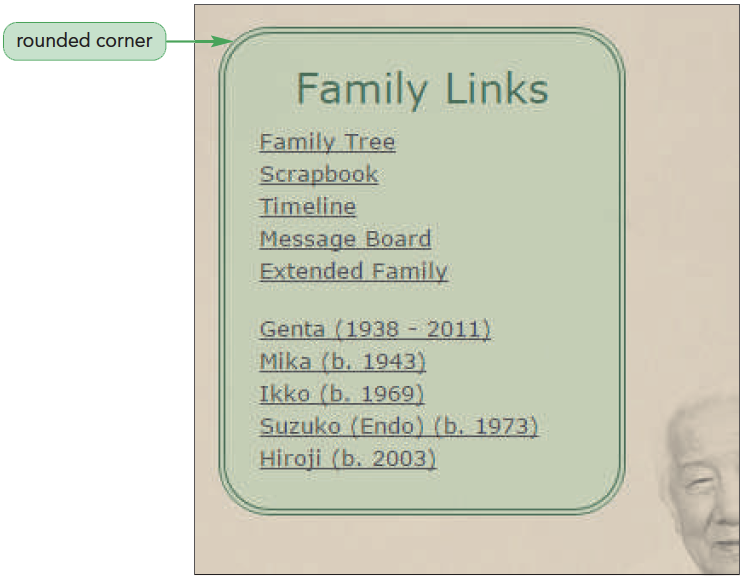
Figure 4-17 highlights the style to create the rounded corners for the aside border.
Figure 4-18 shows the rounded corners for the aside element border.

Applying a Border Image

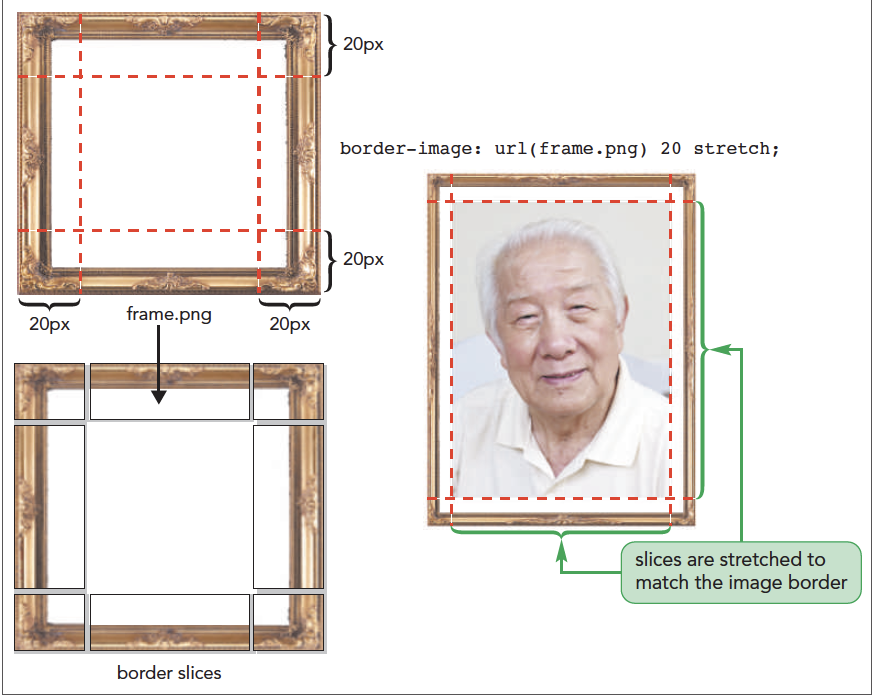
  • A border image is a border based on a graphic image
  • The graphic image is sliced into nine sections representing the four corners, the four sides, and the interior piece
  • The content of the object appears in the interior piece and this piece is discarded
  • The four corners become the corners of the border
  • The four sides are either stretched or tiled to fill in the border's top, right, bottom, and left sides
  • A border image is applied using the following property:
    border-image: url(url) slice repeat;
    • url indicates the source of the graphic image
    • slice indicates the width or height of the slice used to create the sides and corners
    • repeat indicates whether the side slices should be stretched or tiled to cover the four sides of the border
  • The repeat option supports the following values:
    • stretch: The slices are stretched to fill each side
    • repeat: The slices are tiled to fill each side
    • round: When the slices are tiled to fill each side, if they do not fill the sides with an integer number of tiles, the slices are rescaled until they do
    • space: When the slices are tiled to fill each side, if they do not fill the sides with an integer number of tiles, extra space is distributed around the tiles
To create a graphic border:
  1. Return to the tb_visual1.css file in your editor and scroll to the Figure Box Styles at the top of the file.
  2. Add the following style to the style rule for the figure box:
    border-style: solid;
            border-width: 25px;
            border-image: url(tb_border.png) 50 repeat;
  3. Save your changes and reload tb_komatsu.html in your browser.
Figure 4-20 displays the styles used to create the graphic border.
Figure 4-21 shows the appearance of the border image.
Session 4.1 Quick Check
  1. Provide code to create a figure box containing the logo.png image file, no alt text, and a caption with the text Tree and Book.
  2. What is the difference between a vector image and a bitmap image?
  3. Provide the code to use the sidebar.png file as the background image for the page body. Have the image placed in the top-left corner of the page and tiled only in the horizontal direction.
  4. Create a style rule for the header element that fills the header background with tiled images of the back.png, but only over the element content.
  5. Provide a style rule to display the logo.png and side.png image files in the top-left corner of the page body's background. Do not tile the logo.png image, but tile the side.png image vertically. Design your style rule so that logo.png appears on top of the side.png. For the rest of the page body, set the background color to ivory.
  6. Provide a style rule to add a 5-pixel dotted brown border around the aside element.
  7. Provide a style rule to add a 3-pixel solid blue border around the header element with rounded corners of 15 pixels.
  8. Provide a style rule to add elongated corners with a 5-pixel gray inset border around the aside element and with a horizontal radius of 10 pixels and vertical radius of 5 pixels.
  9. Provide a style rule to use the graphic image file border.png as a solid border for the article element. Set the size of the image slice to 30 pixels and stretch the sides to match the sides of the element. Assume a border width of 10 pixels.
«Previous Lesson | Next Lesson »