CHS Web Design Track

Tutorial 5 Designing for the Mobile Web

«Previous Lesson | Chapter Review »

Session 5.3 Print Styles

Designing for Printed Media

To open the Articles of Interest page:
  1. Use your editor to open the tf_articles_txt.html file from the html05 › tutorial folder. Enter your name and the date in the comment section of the file and save it as tf_articles.html.
  2. Within the document head, create links to the tf_reset.css and tf_styles3.css style sheet files in that order.v
  3. Scroll through the document to become familiar with its contents and then save your changes to file, but do not close it.
  4. Open the tf_articles.html file in your web browser.
  5. Take some time to view the contents of the page under different screen resolutions, noting how Marjorie has used responsive design to create different page layouts based on the screen width.
    Now, you’ll examine how Marjorie’s page will appear when printed.
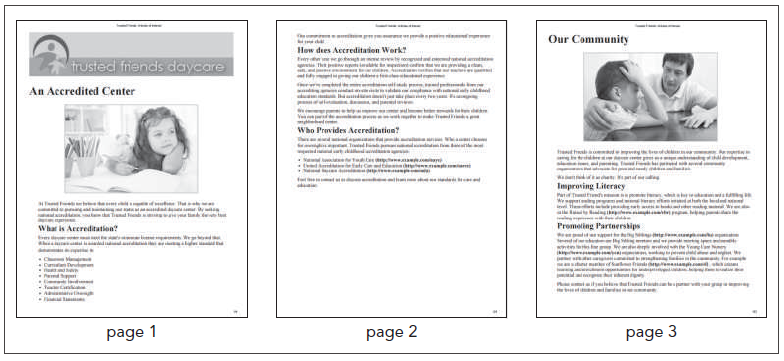
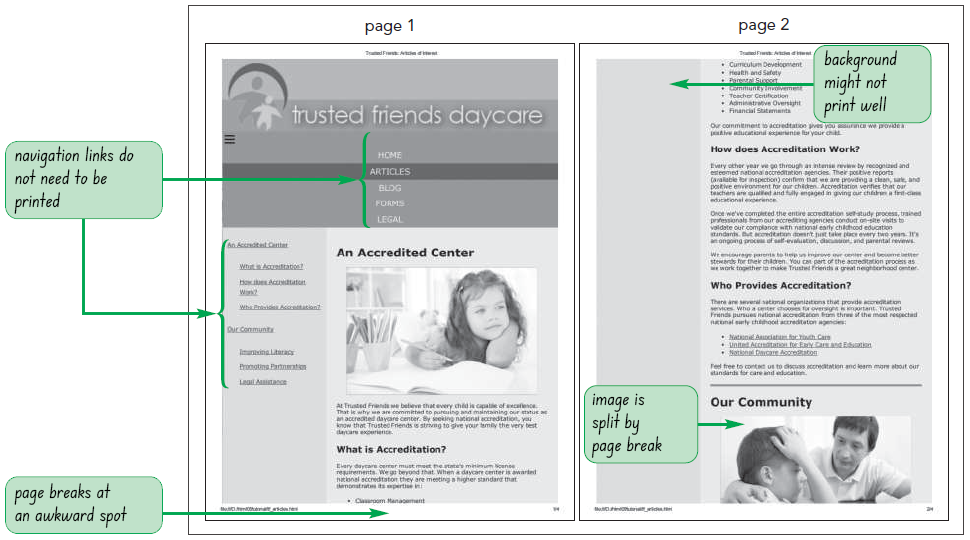
  6. Use the Print Preview command within your browser to preview how this page will appear when printed. Trouble? Depending on your browser and printer, your print preview might appear different from the preview shown in Figure 5-44.
Figure 5-44 shows a preview of the first two pages of the print version using a black and white printer.
 
To access a print style sheet:
  1. Use your editor to open the tf_print_txt.css file from the html05 › tutorial folder. Enter your name and the date in the comment section and save it as tf_print.css.
  2. Return to the tf_articles.html file in your editor. Add the attribute media=”all” to the link element for the tf_reset.css style sheet to apply it to all devices.
  3. Add the attribute media=”screen” to the link element for the tf_styles3.css style sheet to apply it only to screen devices.
  4. Add the following link element for print styles:
    <link href=”tf_print.css” rel=”stylesheet” media=”print” />
  5. Save your changes to the file and close it.
Figure 5-45 highlights the revised link elements in the file.
 
To hide elements in the print version:
  1. Return to the tf_print.css file in your editor.
  2. Go to the Hidden Objects section and add the following style rule:
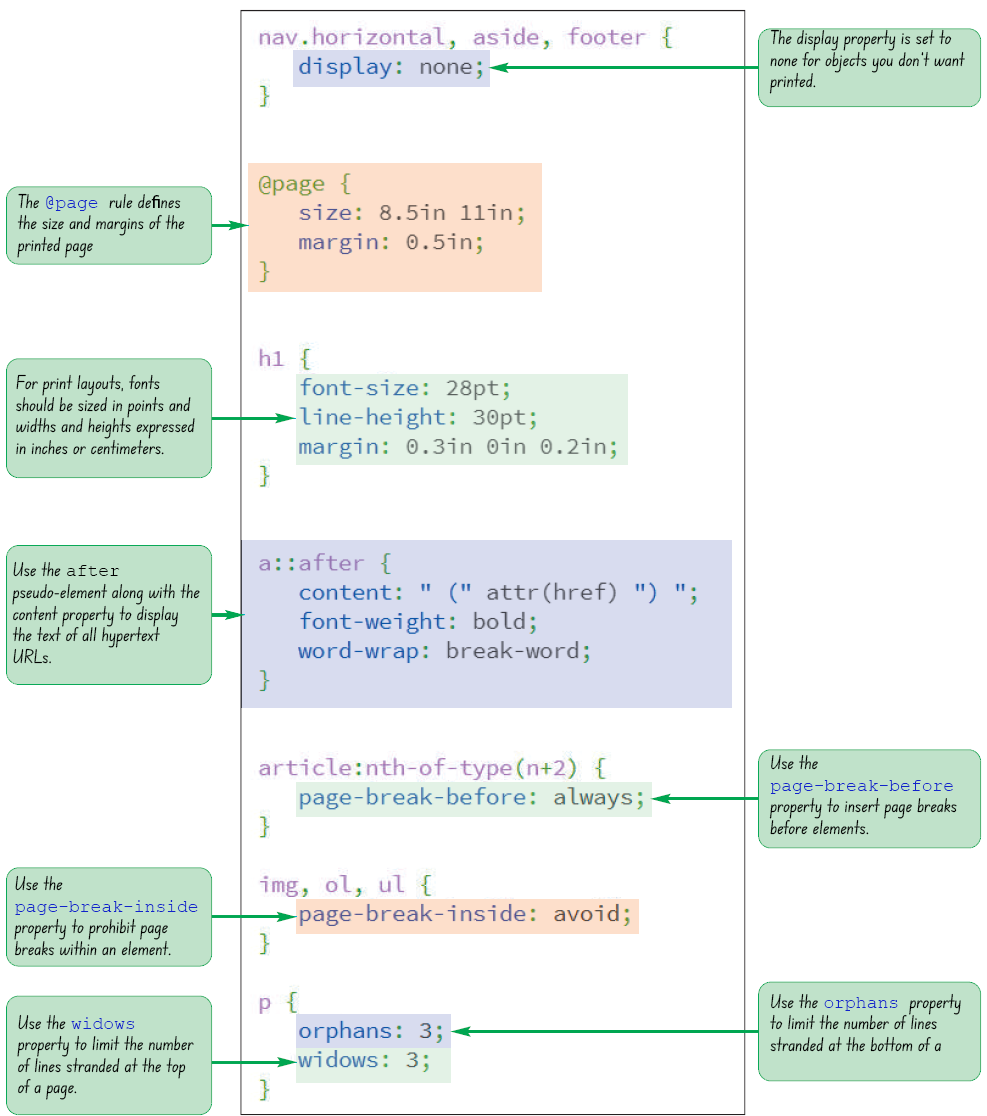
    nav.horizontal, aside, footer {
        display: none;
    }
  3. Save your changes to the file and then reload the tf_articles.html file in your browser and preview the printed output. Verify that the navigation lists, aside elements, and body footer are not displayed in the printed version.
Figure 5-46 highlights the style rule to hide page elements.
 

Class Discussion:

Research the different forms of print media. Draw a comparison between print and broadcast media and their effectiveness.

Working with the @page Rule

Setting the Page Size

Using the Page Pseudo-Classes

Page Names and the Page Property

To define the printed page size:
  1. Go to the Page Box Styles section and add the following rule:
    @page {
        size: 8.5in 11in;
        margin: 0.5in;
    }
  2. Save your changes to the file.
Figure 5-47 highlights the rule to set the page size.
 
To format the printed text:
  1. Go to the Typography Styles section and insert the following styles to format the appearance of h1 and h2 headings and paragraphs:
    h1 {
        font-size: 28pt;
        line-height: 30pt;
        margin: 0.3in 0in 0.2in;
    }
    h2 {
        font-size: 20pt;
        margin: 0.1in 0in 0.1in 0.3in;
    }
    p {
        font-size: 12pt;
        margin: 0.1in 0in 0.1in 0.3in;
    }
  2. Within the List Styles section, add the following style rules to format the appearance of unordered lists:
    ul {
        list-style-type: disc;
        margin-left: 0.5in;
    }
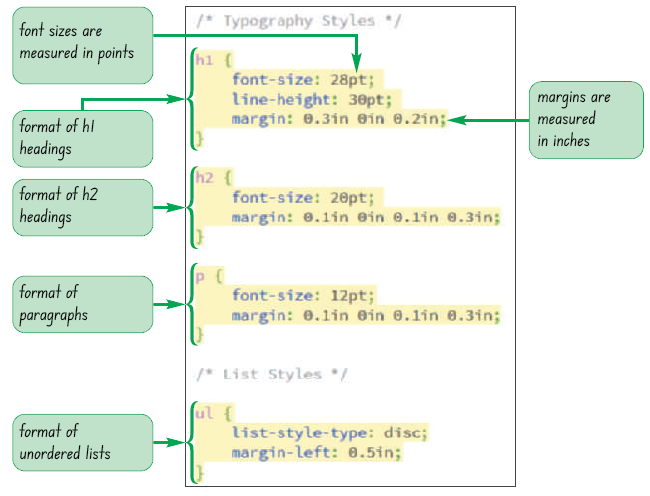
Figure 5-48 shows the typography and list styles in the print style sheet.
 
To format the printed images:
  1. Within the Image Styles section, add the following style rule to format the appearance of inline images within each article element:
    article img {
        border: 2px solid rgb(191, 191,191);
        display: block;
        margin: 0.25in auto;
        width: 65%;
    }
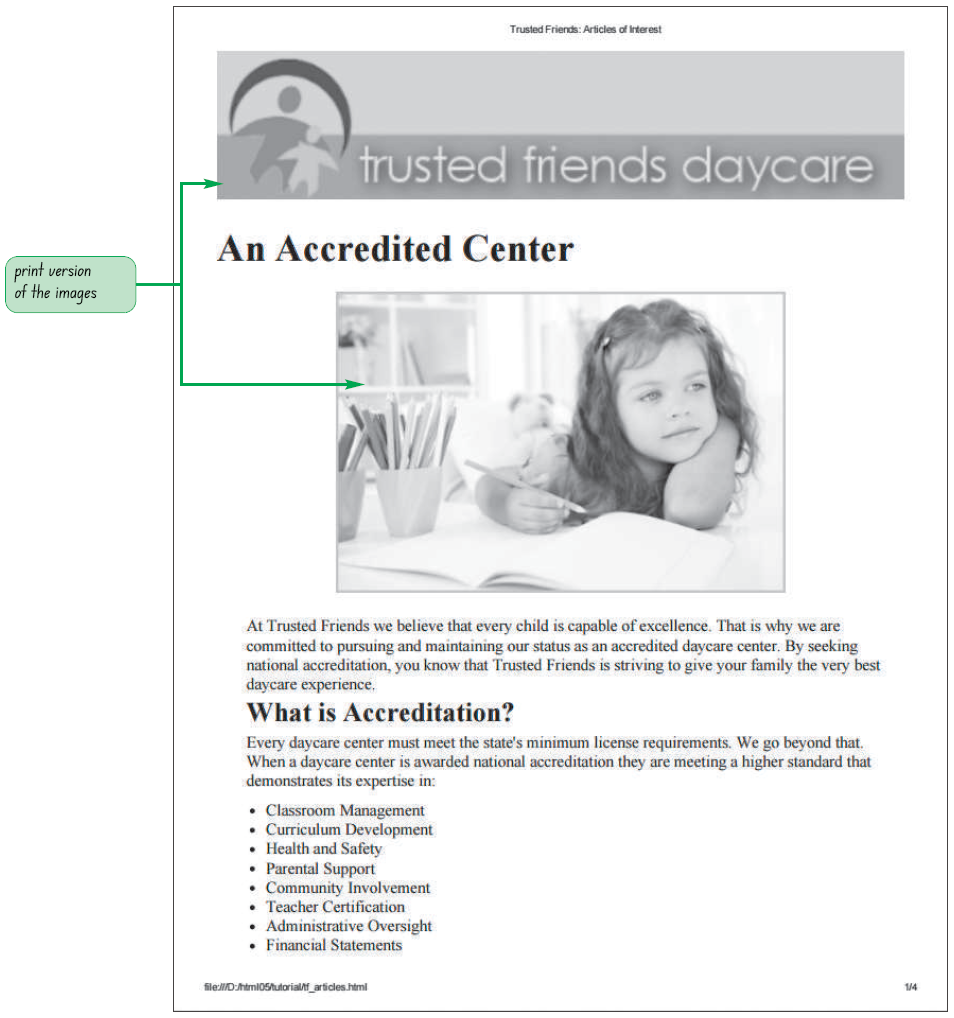
  2. Save your changes to the style sheet and then reload the tf_articles.html file in your browser and preview the appearance of the printed page.
Figure 5-49 shows the style rule for inline images on the printed page.
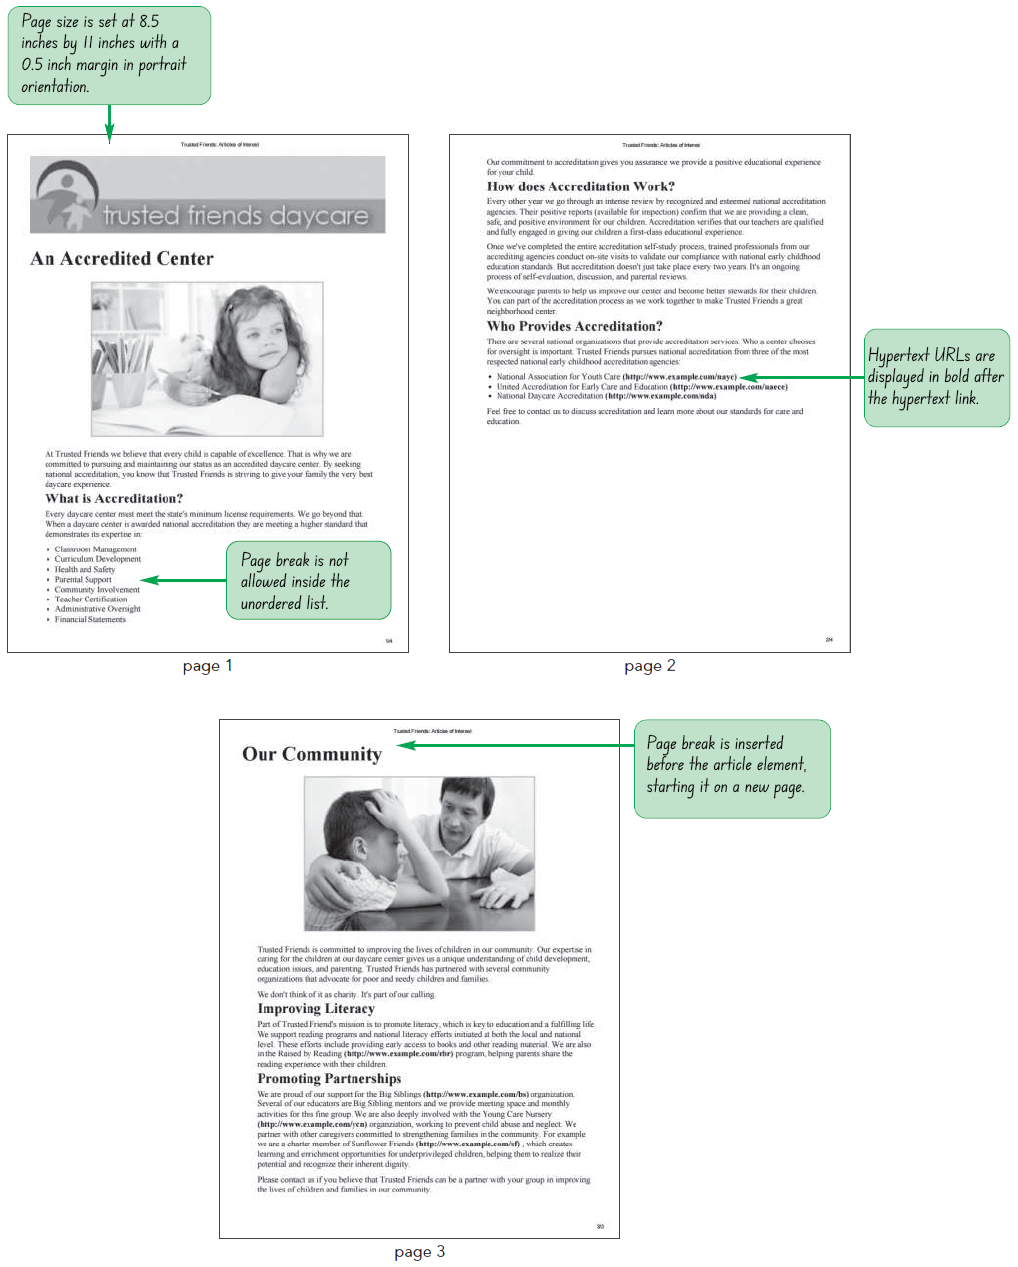
Figure 5-50 shows the appearance of the first page printed using a black and white printer.

Formatting Hypertext Links for Printing

To format the hypertext links:
  1. Return to the tf_print.css file in your editor and go to Hypertext Styles section, inserting the following styles to format the appearance of all hypertext links, appending the URL of each link:
    a {
        color: black;
        text-decoration: none;
    }
        a::after {
        content: “ (“ attr(href) “) “;
        font-weight: bold;
        word-wrap: break-word;
    }
  2. Save your changes to the style sheet and then reload the tf_articles.html file in your browser and preview the page printout.
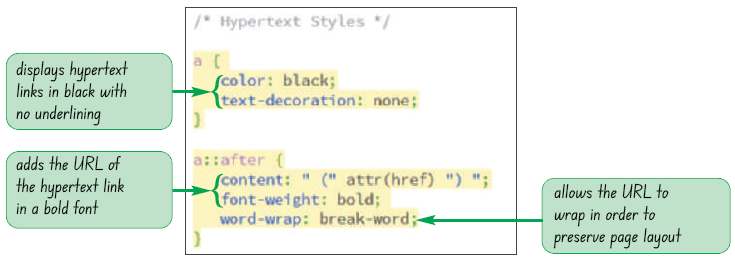

Figure 5-51 describes the style rules used to format printed hypertext links.
Figure 5-52 shows the appearance of the printed hypertext links found on the second page of Marjorie’s printout.
 

Quick Quiz:

  1. True/ False: Once a page name is defined, it can be applied to any element in the document.
 

Class Discussion:

Search the web for free scripting tools that provide options for printing URLs, including scripts that automatically append all URLs as footnotes at the end of the printed document.

Working with Page Breaks

To print each article on a new page:
  1. Go to the Page Break Styles section and insert the following style rule:
    article:nth-of-type(n+2) {
        page-break-before: always;
    }
  2. Save your changes to the file and then reload the tf_articles.html file in your browser and preview the printed page. Verify that the second article in the document on Community Involvement starts on a new page.
Figure 5-53 highlights the style rule to insert the article page breaks.

Preventing Page Breaks

To avoid page breaks:
  1. Return to the tf_print.css file in your editor and go to the Page Break Styles section and insert the following style rule:
    img, ol, ul {
        page-break-inside: avoid;
    }
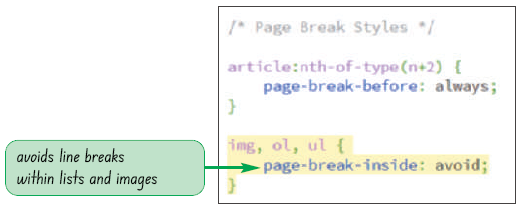
  2. Save your changes to the file.
Figure 5-54 highlights the style rule to avoid page breaks in lists and images.
 

Quick Quiz:

  1. True/ False: Widows and orphans prevent page breaks from being added after a heading.
  2. True/ False: The default value for a widow is 2.

Working with Widows and Orphans

To avoid widows and orphans:
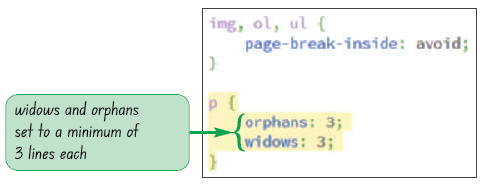
  1. Within the Page Break Styles section of the tf_print.css file, add the following style rule.
    p {
        orphans: 3;
        widows: 3;
    }
  2. Save your changes to the file and then reload the tf_articles.html file in your browser. Preview the appearance of the printed document. Trouble? Depending on your browser and your default printer, your printed version may look slightly different from the one shown in Figure 5-56.
Figure 5-55 highlights the style rule for setting the size of widows and orphans.
Figure 5-56 shows the final appearance of the printed version of this document.
 
Session 5.3 Quick Check
  1. Create a link element that loads the myprint.css style sheet file but only for printed output.
  2. Create a style rule that sets the size of the page box to 8.5 inches by 11 inches with a 1 inch margin.
  3. Create a style rule for right-side pages with a top/bottom margin of 3 centimeters and a left/right margin of 5 centimeters.
  4. Create a page style named smallMargins with a margin of 2 centimeters for every side.
  5. Apply the smallMargins page style to a section element with the id reviews.
  6. Create a style rule to insert a page break before every section element in the document.
  7. Create a style rule to stop page breaks from being placed within any header or footer.
  8. What style would you apply to allow the browser to wrap long strings of text to a new line whenever needed?
  9. Create a style that limits the size of widows and for all article elements to 3 lines.
«Previous Lesson | Chapter Review »