Working with Lists
- List
- is a type of grouping element
- Ordered
- used for items that follow some defined sequential order, such as items arranged alphabetically or numerically
- Unordered
- lists are used for lists in which the items have no sequential order
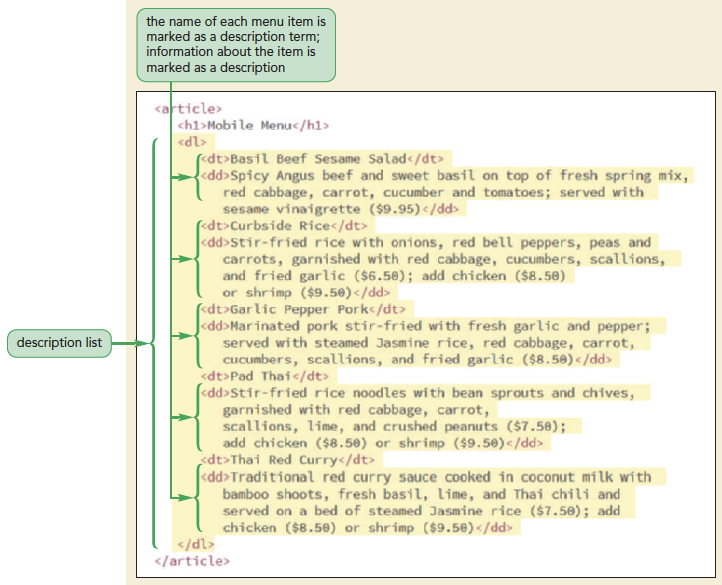
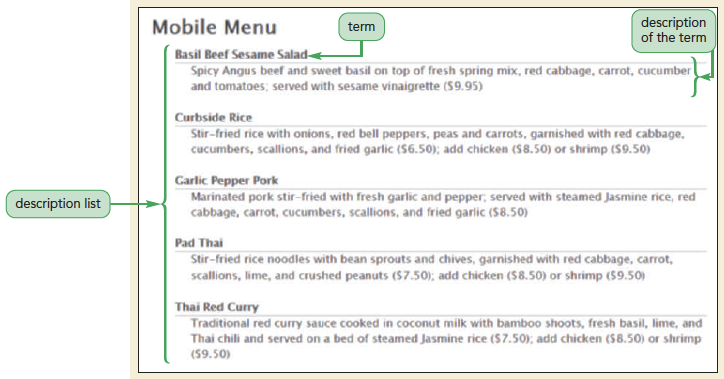
- Description
- lists contain a list of terms and matching descriptions
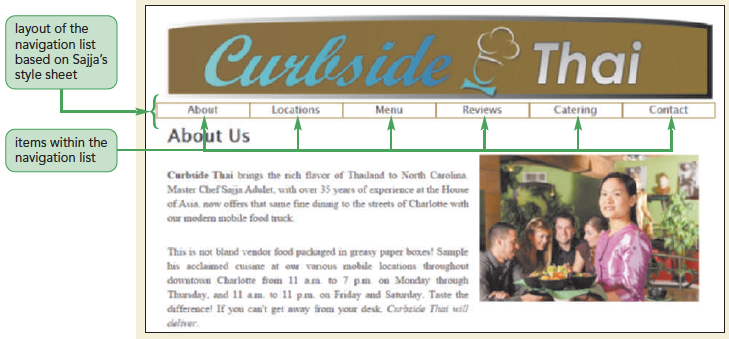
- Navigation lists
- are unordered lists of hypertext links placed within the nav element
To Complete the Menu Page:
- Open the
ct_menu_txt.htmlfile from the html01 > tutorial folder in your HTML editor. Enter your name and the date in the comment section and save the file asct_menu.html. - Open the
ct_pages.txtfile in your text editor if it is not already open and copy the five menu items listed in the Mobile Menu section. - Return to the
ct_menu.htmlfile in your HTML editor and paste the copied text directly after the<h1>Mobile Menu</h1>tag. - Enclose the entire menu within an opening and closing
<dl>tag. - Mark the name of each menu item using the
dtelement. Mark the corresponding description using theddelement. Indent your code to make it easier to read and interpret. - Save your changes to the file and then open the
ct_menu.htmlfile in your browser.
To Create a Page of Times and Locations:
- Open the
ct_locations_txt.htmlfile from the html01 > tutorial folder in your HTML editor. Enter your name and the date in the comment section and save the file asct_locations.html. - Return to the
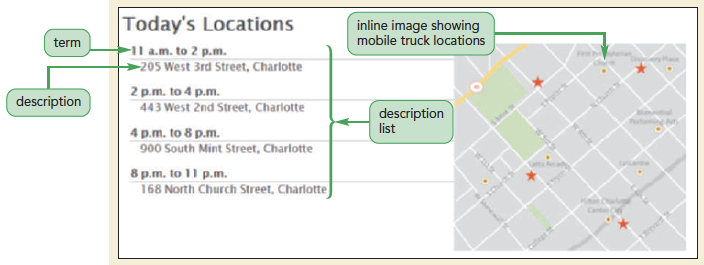
ct_pages.txtfile in your text editor and copy the four locations from the Today's Locations section. - Return to the
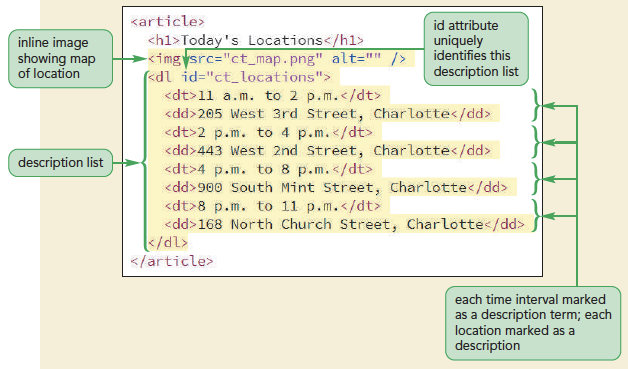
ct_locations.htmlfile in your HTML editor and paste the copied text directly after the<h1>Today's Locations</h1>tag. - Mark the entire list of times and locations using the
dlelement. Mark each time using thedtelement and each location using theddelement. Indent your code to make it easier to read and interpret. - In order to distinguish this description list from other description lists in the website, add the attribute
id=”ct_locations”to the opening<dl>tag. - Sajja has a map that he wants displayed alongside the list of times and locations. Directly after the
h1element within the article element, insert the following inline image:<img src=”ct_map.png” alt=”” /> - Save your changes to the file and then open the
ct_locations.htmlfile in your browser.
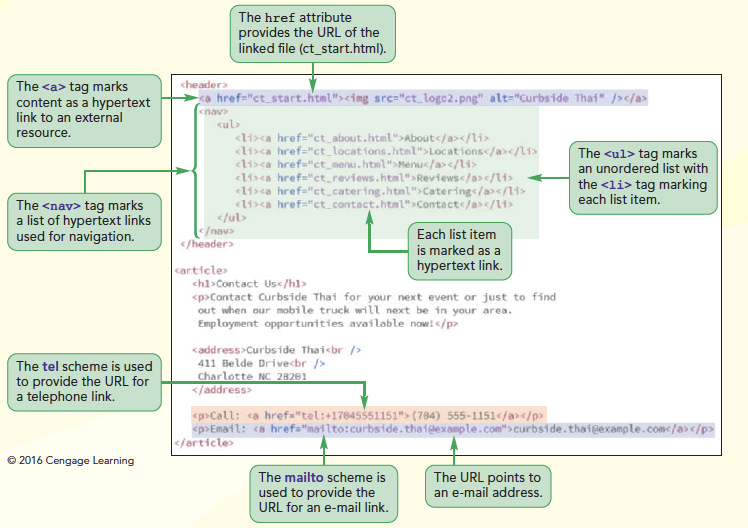
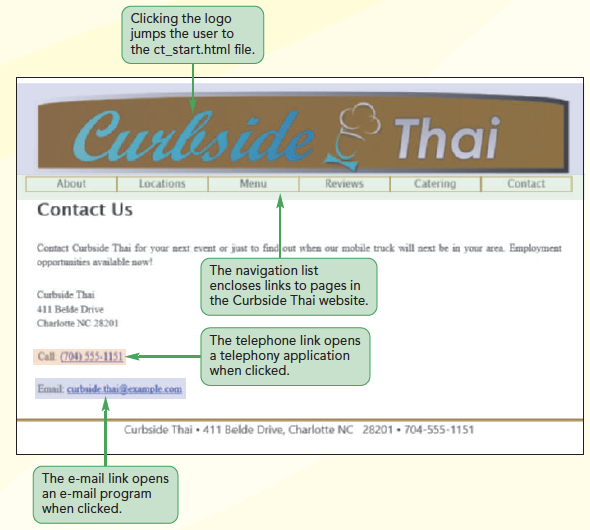
To Create a Navigation List:
- Open the
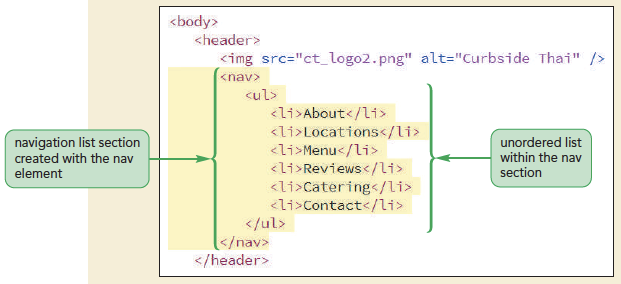
ct_about.htmlfile in your HTML editor if it is not already open. - Go to the body header and, directly below the inline image for the Curbside Thai logo, insert the following navigation list:
<nav> <ul> <li>About</li> <li>Locations</li> <li>Menu</li> <li>Reviews</li> <li>Catering</li> <li>Contact</li> </ul> </nav> - Save your changes to the file and then reopen the
ct_about.htmlfile in your browser.
Working with Hypertext Links
- Hypertext is created by enclosing content within a set of opening and closing
<a>tags like:<a href=“url”>content</a>whereurlis Uniform Resource Locator (URL) - Inline images can also be turned into links by enclosing the image within opening and closing
<a>tags<a href=“ct_start.html”><img src=“ct_logo2.png” /></a>
To create hypertext links:
- Return to the
ct_about.htmlfile in your HTML editor. - Mark the first entry as a hypertext link pointing to
ct_about.htmlfile by changing the list item to<a href=”ct_about.html”>About</a>
- Change the code of the second list item to
<a href=”ct_locations.html”>Locations</a>
- Continuing in the same fashion, change the Menu entry to a link pointing to the
ct_menu.html file, the Reviews entry to a link pointing to thect_reviews.htmlfile, the Catering entry to a link pointing to thect_catering.htmlfile, and the Contact entry to a link pointing to thect_contact.htmlfile. - Save your changes to the file and then reopen the
ct_about.htmlfile in your browser. - Click each of the six navigation list entries and verify that the browser loads the corresponding web page. Use the Back button on your browser to return to the About Curbside Thai page after you view each document.
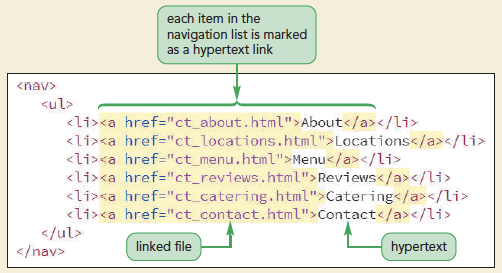
Trouble? If the links do not work, be sure your code matches Figure 1-38. For example, check the spelling of each filename in the href attribute of each <a> tag to ensure it matches the filename of the corresponding Curbside Thai web page and check to be sure you have all needed opening and closing tags.
To mark an image as a hypertext link:
- Return to the
ct_about.htmlfile in your HTML editor. - Mark the image in the body header as a hyperlink by changing the HTML code to
<a href=”ct_start.html”><img src=”ct_logo2.png”alt=”Curbside Thai” /></a>
- Save your changes to the file and then reopen the
ct_about.htmlfile in your browser. - Click the Curbside Thai logo and verify that the browser opens the Curbside Thai Startup page. Click the Back button to return to the About Curbside Thai page.

To copy and paste the hypertext links:
- Return to the
ct_about.htmlfile in your HTML editor. - Copy the entire content of the page header from the opening
<header>tag through to the closing</header>tag, including the revised code for the company logo and navigation list. - Go to the
ct_locations.htmlfile in your HTML editor. Paste the copied HTML code, replacing the previous page header in this document. Save your changes to the file. - Repeat the previous step for the
ct_menu.html,ct_reviews.html,ct_catering.html, andct_contact.htmlfiles, replacing the body header in each of those documents with the revised header fromct_about.html. Save your changes to each file. - Reopen the
ct_locations.htmlfile in your browser and verify that you can jump from one page to another by clicking items in the navigation list at the top of each page. Also verify that you can jump to the Startup page at any time by clicking the Curbside Thai logo.
Specifing the Folder Path
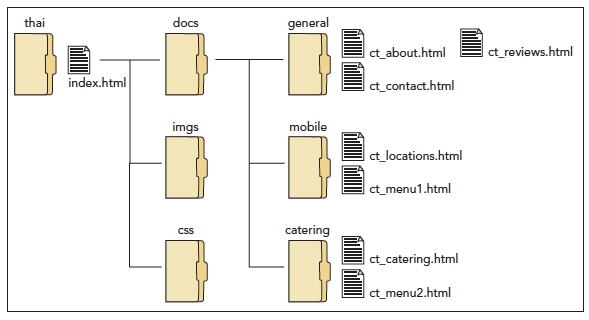
- Root folder
- is the first or top-most directory in a hierarchy.
- An absolute path
- is a path that starts from the root folder and processes down the entire folder structure described with the expression
/folderl/folder2/folder3/file
Example/thai/docs/catering/ct_catering.html
/drivel|/folderl/folder2/folder3/file
/E|/thai/docs/catering/ct_catering.html
- Relative
- paths in which the path is expressed relative to the location of the current document.
- If the linked file is in a subfolder of the current document, the path includes all of the subfolder names starting from the location of the current page using the expression
folderl/folder2/folder3/file
docs/general/ct_about.html
- Relative paths are often expressed in terms of familial relationships such as parent, child, descendant, sibling, and so forth in order to indicate the hierarchical nature of the folder structure.
- Relative paths can also go up the hierarchy to parent folders by including the symbol ( .. ),which means “go up one level.”
../../index.html
- If the linked file is in a subfolder of the current document, the path includes all of the subfolder names starting from the location of the current page using the expression
Linking to a Location within a Document
- To jump to a specific location within a document, identify that location by adding the following
idattribute to an element tag at that locationid=”text”
<h2 id=”lunch”>Lunch Menu</h2>
- IDs must be unique
- Once the location is marked with an ID, link to that element using the following hypertext link:
<a href=”file#id”>content</a>where file points to the location and filename of the linked document and id is the value of an id attribute within that document.<a href=”ct_fullmenus.html#lunch”>Viewour Lunch Menu</a>
- To link to a location within the current page, include only the ID value along with the# symbol.
<a href=”#lunch”>View our Lunch Menu</a>
Linking to the Internet and Other Resources
- The type of resource that a hypertext link points to is indicated by the link's URL scheme: location where scheme indicates the resource type and location provides the resource
- Protocol is a set of rules defining how information is passed between two devices
Linking to a Web Resource
- Links to Web resources have a general structure like:
http://server/path/filename#idwhere server is the name of the web server hosting the resource, path is the path to the file on that server, filename is the name of the file, and if necessary, id is the name of an id within a file
Linking to an E-Mail Address
- E-mail address can be turned into a hypertext link using the URL:
mailto : address
To link to an e-mail address:
- Go to the
ct_contact.htmlfile in your HTML editor. - Change the Curbside Thai e-mail address into the following
mailtohypertext link:<a href=”mailto:curbside.thai@example.com”> curbside.thai@example.com </a>
- Save your changes to the file and then reopen the
ct_contact.htmlfile in your browser. - Click the e-mail address link and verify that your device opens your e-mail program with the Curbside Thai address already entered. Close the e-mail
program without sending a message.
Trouble? Depending on your device, you may have to set up your e-mail program to accept hypertext links.

Linking to a Phone Number
- Many developers include links to phone numbers for their company's customer service or help line
- The URL for a phone link is
tel : phone
To link to a phone number:
- Return to the
ct_contact.htmlfile in your HTML editor. - Change the Curbside Thai phone number into the following hypertext link:
<a href=”tel:+17045551151”>(704) 555-1151</a>
- Save your changes to the file.

