CHS Web Design Track

Getting Started with CSS: CSS Styles and Colors

<< Previous Lesson | Next Lesson >>

Session 2. 3 Visual Overview:

Pseudo Elements and Classes
Formatting Lists

List marker (disc)
It is the default browser style symbol displayed before each list item for unordered and ordered lists is numbers starting with 1
  • To change the type of list marker or to prevent any display of a list marker, use
    list-style-type: type;
    where type is the various types of markers
list-style-typeMarker(s)
disc
  • circle
  • square
  • decimal 1, 2, 3, 4, …
    decimal-leading-zero 01, 02, 03, 04, …
    lower-roman i, ii, iii, iv, …
    upper-roman I, II, III, IV, …
    lower-alpha a, b, c, d, …
    upper-alpha A, B, C, D, …
    lower-greek a, b, g, d, …
    upper-greek A, B, G, D, …
    none no marker displayed
    To apply an outline style:
    1. If you took a break after the previous session, make sure the tss_styles.css file is open in your editor.
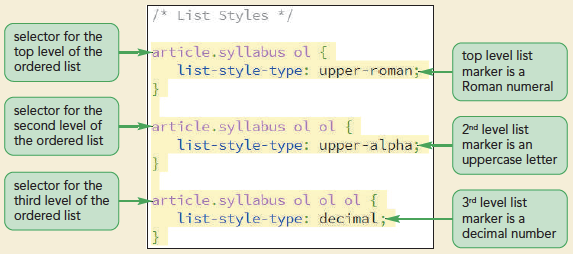
    2. Scroll down to the List Styles section and insert the following style rules to format nested ordered lists within the syllabus article:
       article.syllabus ol {
      list-style-type: upper-roman;
      }
      article.syllabus ol ol {
      list-style-type: upper-alpha;
      }
      article.syllabus ol ol ol {
      list-style-type: decimal;
      }
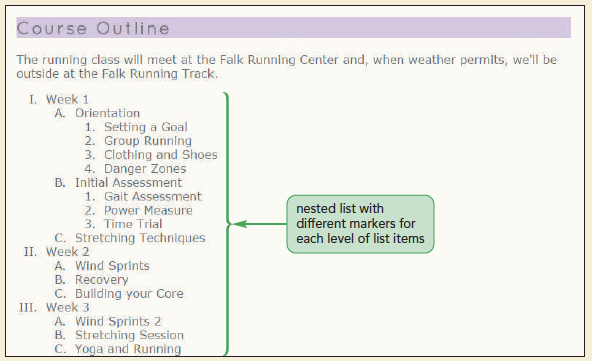
    3. Save your changes to the file and then open the tss_run.html file in your browser.
    Figure 2-32 highlights the style rule for the nested lists.
    As shown in Figure 2-33, the syllabus for the class should now be displayed in an outline style.
    To remove the markers from navigation lists:
    1. Return to the tss_styles.css file in your editor.
    2. Go to the Navigation Styles section and, within the style rule for the nav > ul selector, add the style list-style-type: none;
    3. Save your changes to the file and then open the tss_home.html file in your browser. Verify that there are no markers next to the navigation list items in the left column.
    4. Go to the other three pages in the website and verify that navigation lists in these pages also do not have list markers.
    Figure 2-34 highlights the new style.

    Using Images for List Markers

    To use an image for a list marker:
    1. Return to the tss_styles.css file in your editor.
    2. At the top of the List Styles section, insert the following style rule:
      article#about_tss ul {
      list-style-image: url(runicon.png);
      }
    3. Save your changes to the file and then open the tss_home.html file in your browser.
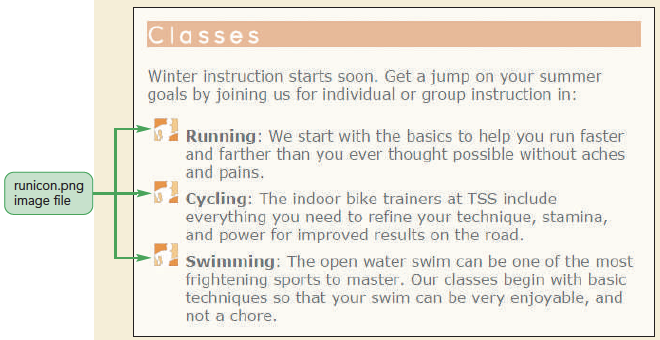
    Figure 2-35 highlights the style rule to use the runicon.png file as the list marker image.
    As shown in Figure 2-36 the items in the unordered list now use the runicon.png image file as their list marker.

    Setting the List Marker Position

    Class Discussion:

    How often do you use a bulleted list in your everyday lives? Some people rely on them heavily to keep track of all kinds of information. How beneficial can lists be for presenting information in a Web format?
    Working with Margins and Padding

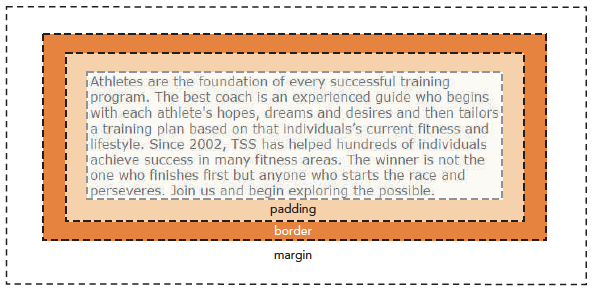
    • Block-level elements follow the structure of the box model
    • Contents in a box model are enclosed within the following series of concentric boxes:
      • The content of the element itself
      • The padding space, which extends from the elements content to a border
      • The border surrounding the padding space
      • The margin space comprised of the space beyond the border up to the next page element

    Setting the Padding Space

    To change the left padding used in the navigation list:
    1. Return to the tss_styles.css file in your editor.
    2. Locate the nav > ul style rule in the Navigation Styles section and insert the style padding-left: 5px;
    3. Save your changes to the file and then reload the tss_home.html file in your browser. Verify that the entries in the navigation list in the left column have been shifted to the left, which is the result of changing the left padding setting to 5 pixels.
    Figure 2-39 highlights the new style for all navigation lists.

    Setting the Margin and Border Spaces

    To increase the top margin:
    1. Return to the tss_styles.css file in your editor.
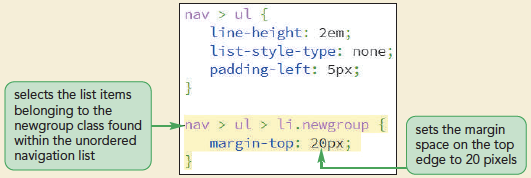
    2. Directly below the style rule for the nav > ul selector in the Navigation Styles section, insert the following rule:
      nav > ul > li.newgroup {
      margin-top: 20px;
      }
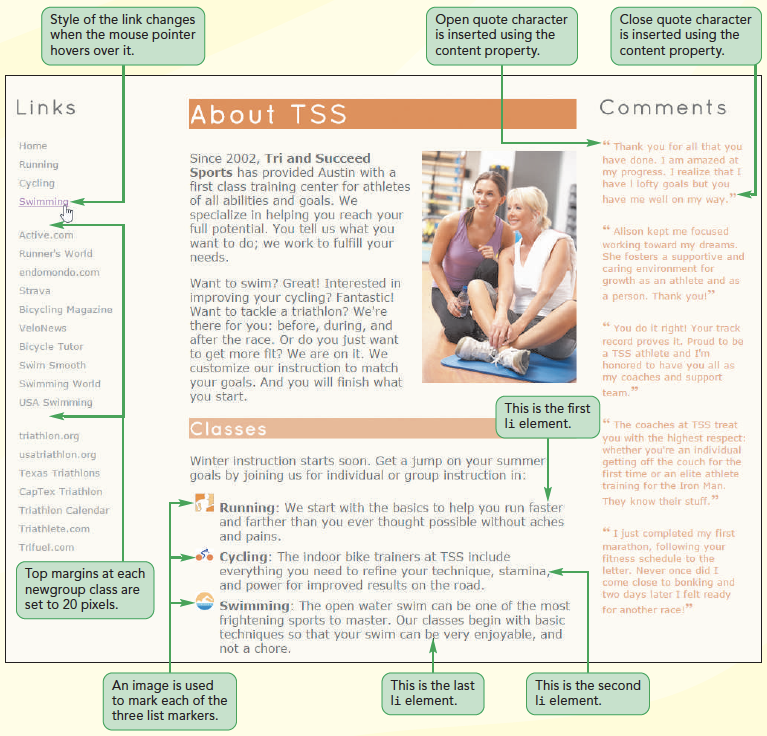
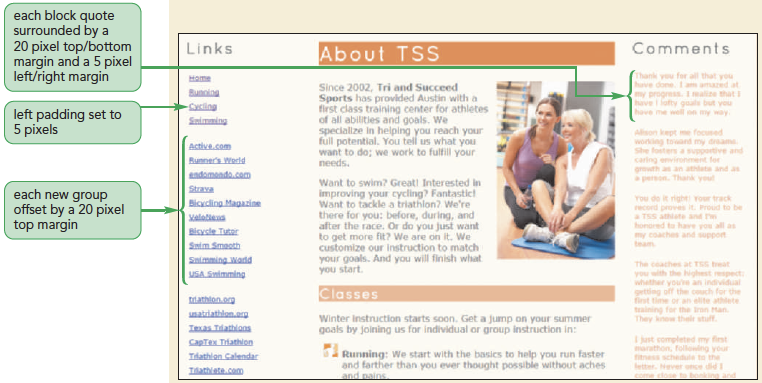
    3. Save your changes to the file and then reload the tss_home.html file in your browser. Verify that the entries in the navigation list are now split into three groups: the first group containing the links from the Tri and Succeed Sports website; the second group containing links to websites on running, cycling, and swimming; and the third group containing links to triathlon websites.
    Figure 2-40 highlights the style rule setting the top margin value.
    To change the margin space around block quotes:
    1. Return to the tss_styles.css file in your editor.
    2. Locate the style rule for the aside blockquote selector in the Aside and Blockquote Styles section and insert the margin: 20px 5px; style into the style rule.
    3. Save your changes to the file and then reload the tss_home.html file in your browser.
    Figure 2-41 displays the style to change the margin space around the blockquote element.
    Figure 2-42 displays the revised appearance of the page with the new padding and margin sizes applied to the navigation list and the block quotes.

    Quick Quiz:

    1. What is the default left padding space value set by most browsers while working with ordered and unordered lists?
    2. True/False:
      p {padding: 15px 20px;}
      The above code sets the top and bottom padding spaces at 15 pixels and 20 pixels, respectively.

    Using Pseudo-Classes and Pseudo-Elements

    Structural pseudo-class—classifies an element based on its location within the structure of the HTML document
    Pseudo-class
    classifies an element based on its current status, position, or use in the document
    element:pseudo-class
    where element is an element from the document and pseudo-class is the name of a css pseudo-class
    Pseudo-ClassMatches
    :root The top element in the document hierarchy (the html element)
    :empty An element with no content
    :only-child An element with no siblings
    :first-child The first child of the parent element
    :last-child The last child of the parent element
    :first-of-type The first descendant of the parent that matches the specified type
    :last-of-type The last descendant of the parent that matches the specified type
    :nth-of-type(n) The nth element of the parent of the specified type
    :nth-last-of-type(n) The nth from the last element of the parent of the specified type
    :only-of-type An element that has no siblings of the same type
    :lang(code) The element that has the specified language indicated by code
    :not(selector) An element not matching the specified selector
    To apply pseudo-classes to an unordered list:
    1. Return to the tss_styles.css file in your editor.
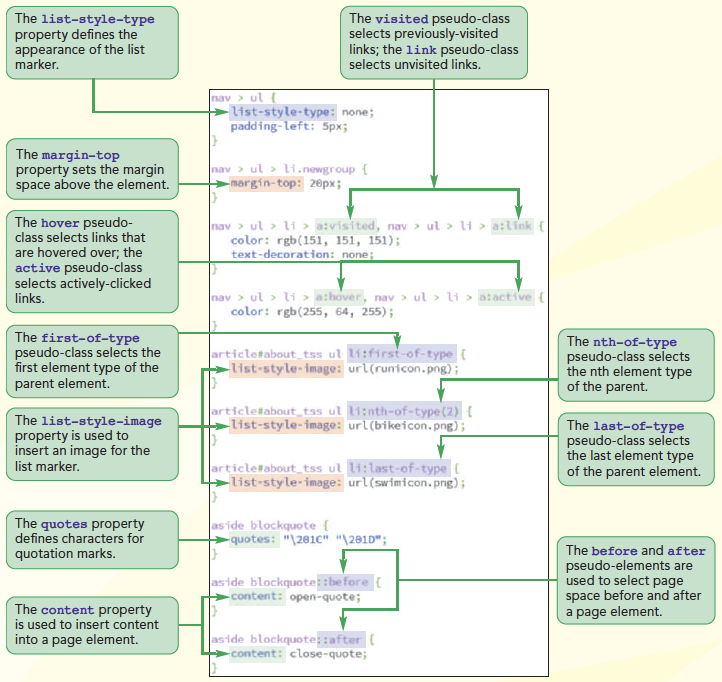
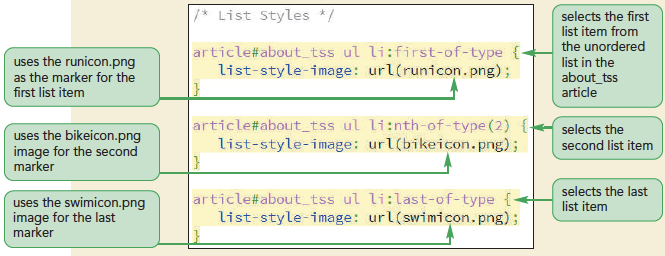
    2. Go to the List Styles section at the bottom of the style sheet, delete the article#about_tss ul style rule that sets the list style image marker and replace it with the following three style rules:
      article#about_tss ul li:first-of-type {
      list-style-image: url(runicon.png);
      }
      article#about_tss ul li:nth-of-type(2) {
      list-style-image: url(bikeicon.png);
      }
      article#about_tss ul li:last-of-type {
      list-style-image: url(swimicon.png);
      }
    3. Save your changes to the file and then reload the tss_home.html file in your browser.
    Figure 2-44 highlights the three selectors and their associated style rules using pseudo-classes with the unordered list items.
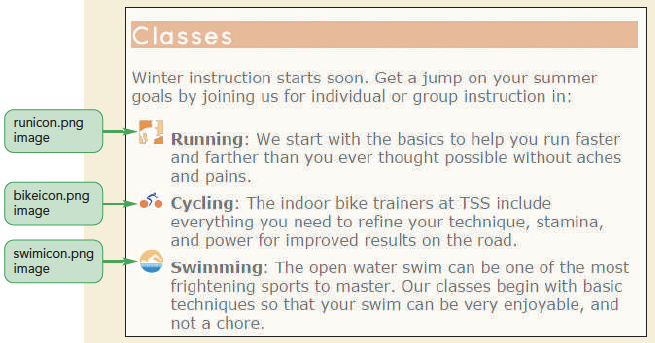
    Figure 2-45 shows the new format of the unordered list with different image markers used with each of the list items.

    Pseudo-classes for Hypertext

    Dynamic pseudo-class
    A type of pseudo-class in which the class can change state based on the actions of the user
    Pseudo-ClassMatches
    :link The link has not yet been visited by the user.
    :visited The link has been visited by the user.
    :active The element is in the process of being activated or clicked by the user.
    :hover The mouse pointer is hovering over the element.
    :focus The element is receiving the focus of the keyboard or mouse pointer.
    To apply pseudo-classes to a hypertext links:
    1. Return to the tss_styles.css file in your editor.
    2. Go to the Navigation Styles section and insert the following style rules for hypertext links that have been visited or not visited.
       nav > ul > li > a:link, nav > ul > li > a:visited {
      color: rgb(151, 151, 151);
      text-decoration: none;
      }
    3. Add the following new style rules for links that are being hovered over or are active:
      nav > ul > li > a:hover, nav > ul > li > a:active {
      color: rgb(255, 64, 255);
      text-decoration: underline;
      }
    4. Save your changes to the file and then reload the tss_home.html file in your browser and hover your mouse pointer over the links in the navigation list.
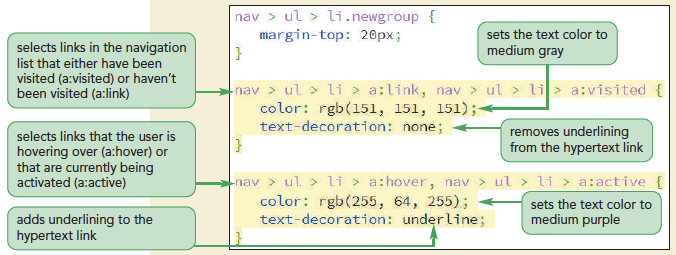
    Figure 2-47 highlights the style rules for hypertext links in the navigation list.
    Figure 2-48 shows the hover effect applied to the link to the TSS swimming class.

    Pseudo-Elements

    Pseudo-element
    An object that exists only in the rendered page
    Pseudo-ElementDescription
    ::first-letter The first letter of the element text
    ::first-line The first line of the element text
    ::before Content inserted directly before the element
    ::after Content inserted directly after the element

    Quick Quiz:

    1. True/False: Two or more pseudo-classes can be applied to the same element.
    2. True/False: The default browser style to display all visited links is to highlight them in blue.

    Generating Content with CSS

    ValueDescription
    none Sets the content to an empty text string
    counter Displays a counter value
    attr(attribute) Displays the value of the selector's attribute
    text Displays the specified text
    open-quote Displays an opening quotation mark
    close-quote Displays a closing quotation mark
    no-open-quote Removes an opening quotation mark, if previously specified
    no-close-quote Removes a closing quotation mark, if previously specified
    url(url) Displays the content of the media (image, video, etc.) from the file located at url

    Displaying Attribute Values

    Quick Quiz:

    1. True/False: The close-quote property is used to remove a previously specified closing quotation mark.
    2. True/False: The no-open-quote property is used to display an opening quotation mark.

    Inserting Quotation Marks

    To insert quotes into block quotes:
    1. Return to the tss_styles.css file in your editor.
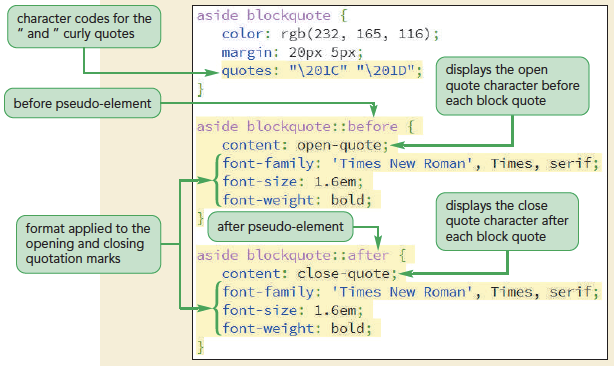
    2. Go to the Aside and Blockquote Styles section and, within the style rule for the aside blockquote selector, insert the following quotes property to use curly quotes for the quotation marks:quotes: "\201C" "\201D";
    3. Add the following style rules to insert quotation marks before and after each block quote in the aside element:
      aside blockquote::before {
          content: open-quote;
          font-family: 'Times New Roman', Times, serif;
          font-size: 1.6em;
          font-weight: bold;
      }
      aside blockquote::after {
          content: close-quote;
          font-family: 'Times New Roman', Times, serif;
          font-size: 1.6em;
          font-weight: bold;
      }
    4. Save your changes to the file and then reload the tss_home.html file in your browser.
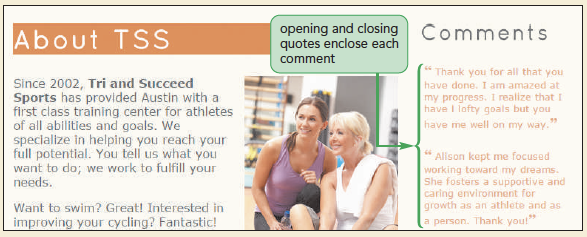
    Figure 2-51 highlights the styles to add curly quotes before and after each block quote.
    As shown in Figure 2-52, bold quotation marks have been added before and after each customer comment.

    Quick Quiz:

    1. True/False: The blockquote and q elements are used for quoted material.
    2. True/False: It is not possible in HTML to have nested quotation marks.

    Session 2.3 Quick Check

    1. Provide a style rule to display all unordered lists with lowercase letters as the list marker.
    2. Provide a style rule to display all unordered lists using the star.png image file, placed inside the virtual box.
    3. Provide a style rule to display the text of all previously visited hypertext links in gray .
    4. Provide the style rule to set the padding around every hl heading in a section element to 1 em on top, 0.Sem on the left and right, and 2em on the bottom.
    5. Provide the style rule to change the left margin of the figure element to 20 pixels .
    6. Describe the item selected by the following selector:
      #top > p : first-of-type : first-line
    7. Describe the items selected by the following selector:
      div .Links img(usemap)
    8. Provide a style rule to insert the text string”***” before every paragraph belonging to the Review class.
    9. Provide the style property to set the opening quotation mark and closing quotation marks to curly quotes with Unicode values of 2018 and 2019 respectively.
    << Previous Lesson | Next Lesson >>