CHS Web Design Track

Tutorial 6 Working with Tables and Columns

«Previous Lesson | Chapter Review »

Session 6.2 Visual Overview:

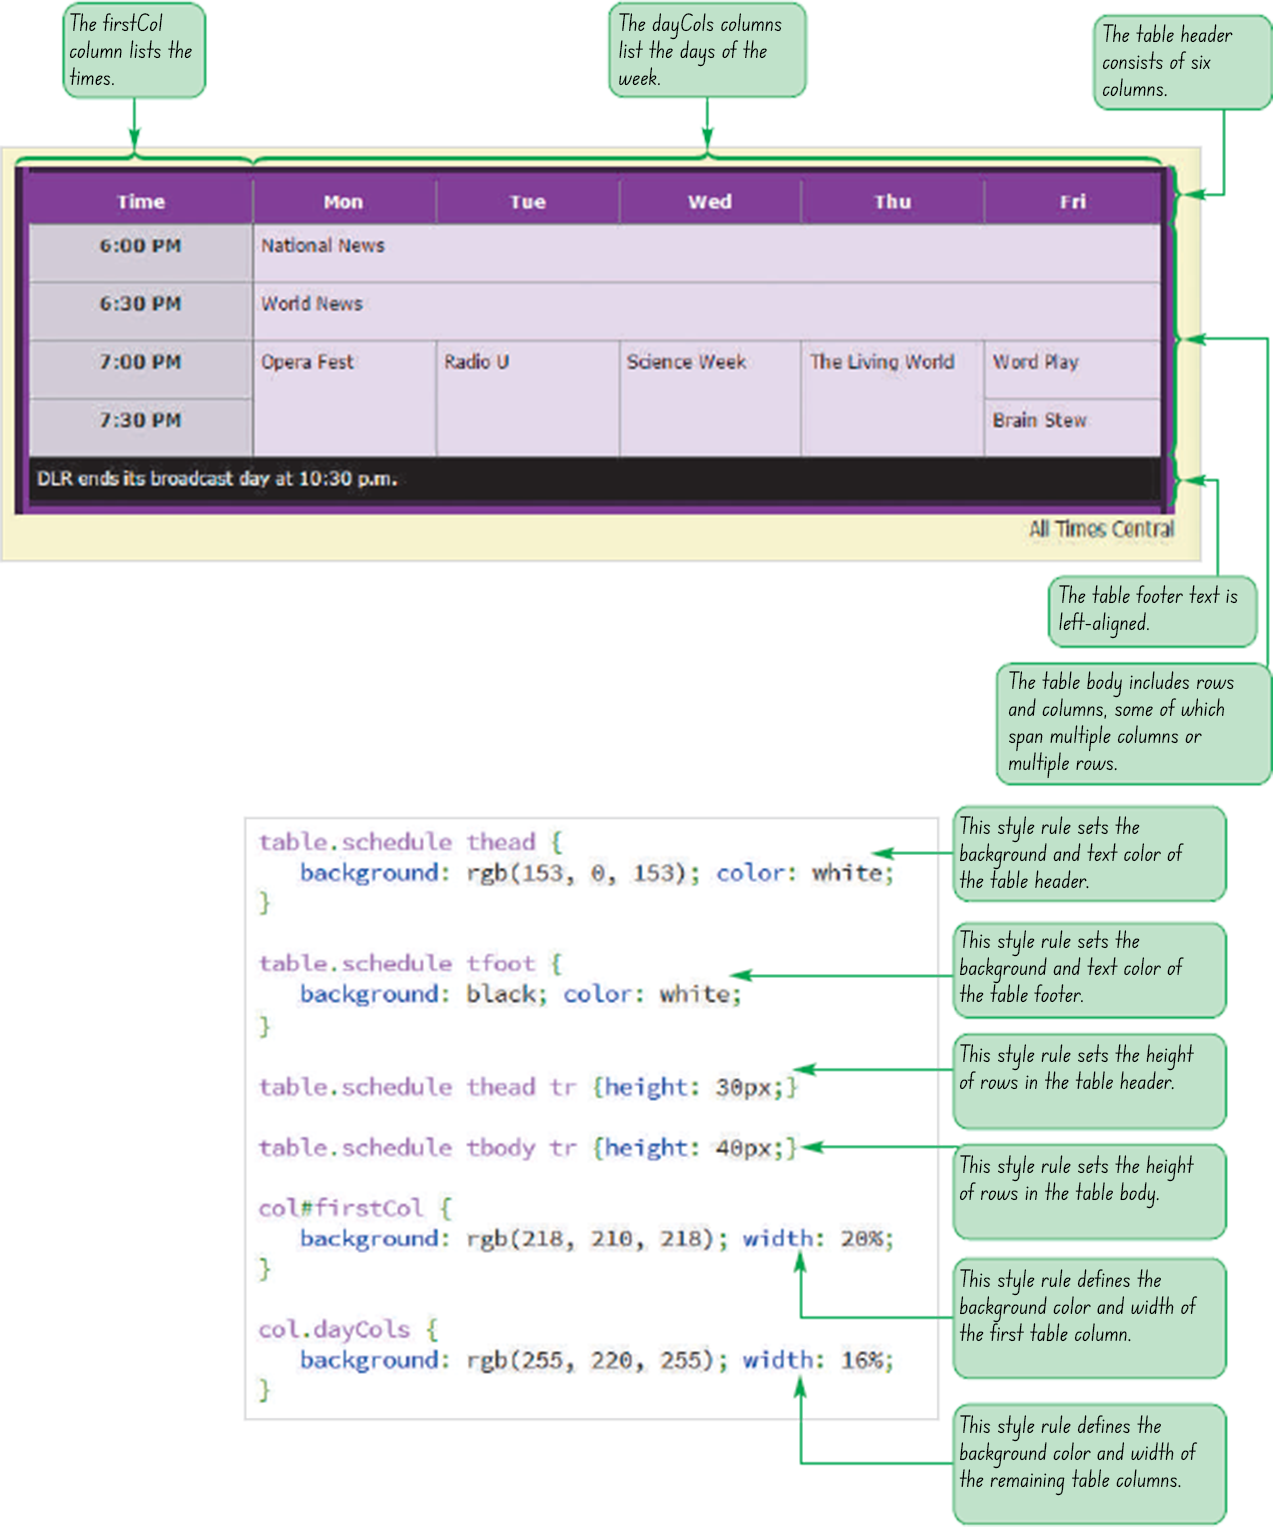
Rows and Column Groups
Creating Row Groups

To create table row groups:
  1. If you took a break after the last session, make sure the dlr_evenings.html file is open in your editor.
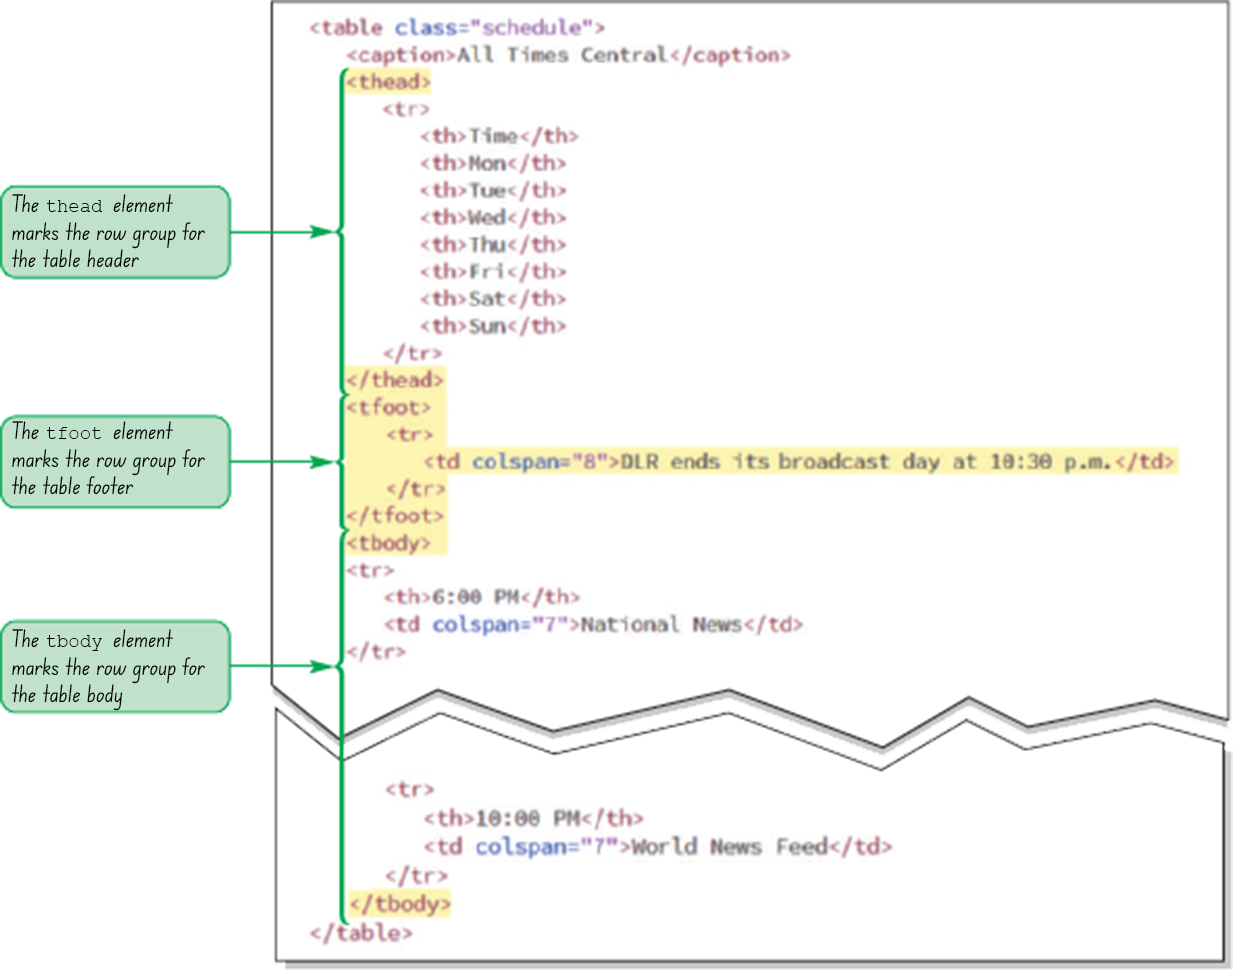
  2. Enclose the first table row within an opening and closing set of <thead> tags to mark that row as the table header. Indent the HTML code for the row to make it easier to read.
  3. Directly below the closing </thead> tag, insert the following table footer consisting of a single row with one data cell spanning eight columns:
    <tfoot>
        <tr>
            <td colspan=”8”>DLR ends its broadcast day at
            10:30 p.m.</td>
        </tr>
    </tfoot>
  4. . Enclose the remaining table rows within an opening and closing set of <tbody> tags to mark those rows as belonging to the table body. Indent the HTML code for those rows to make them easier to read.
  5. Save your changes to the file.
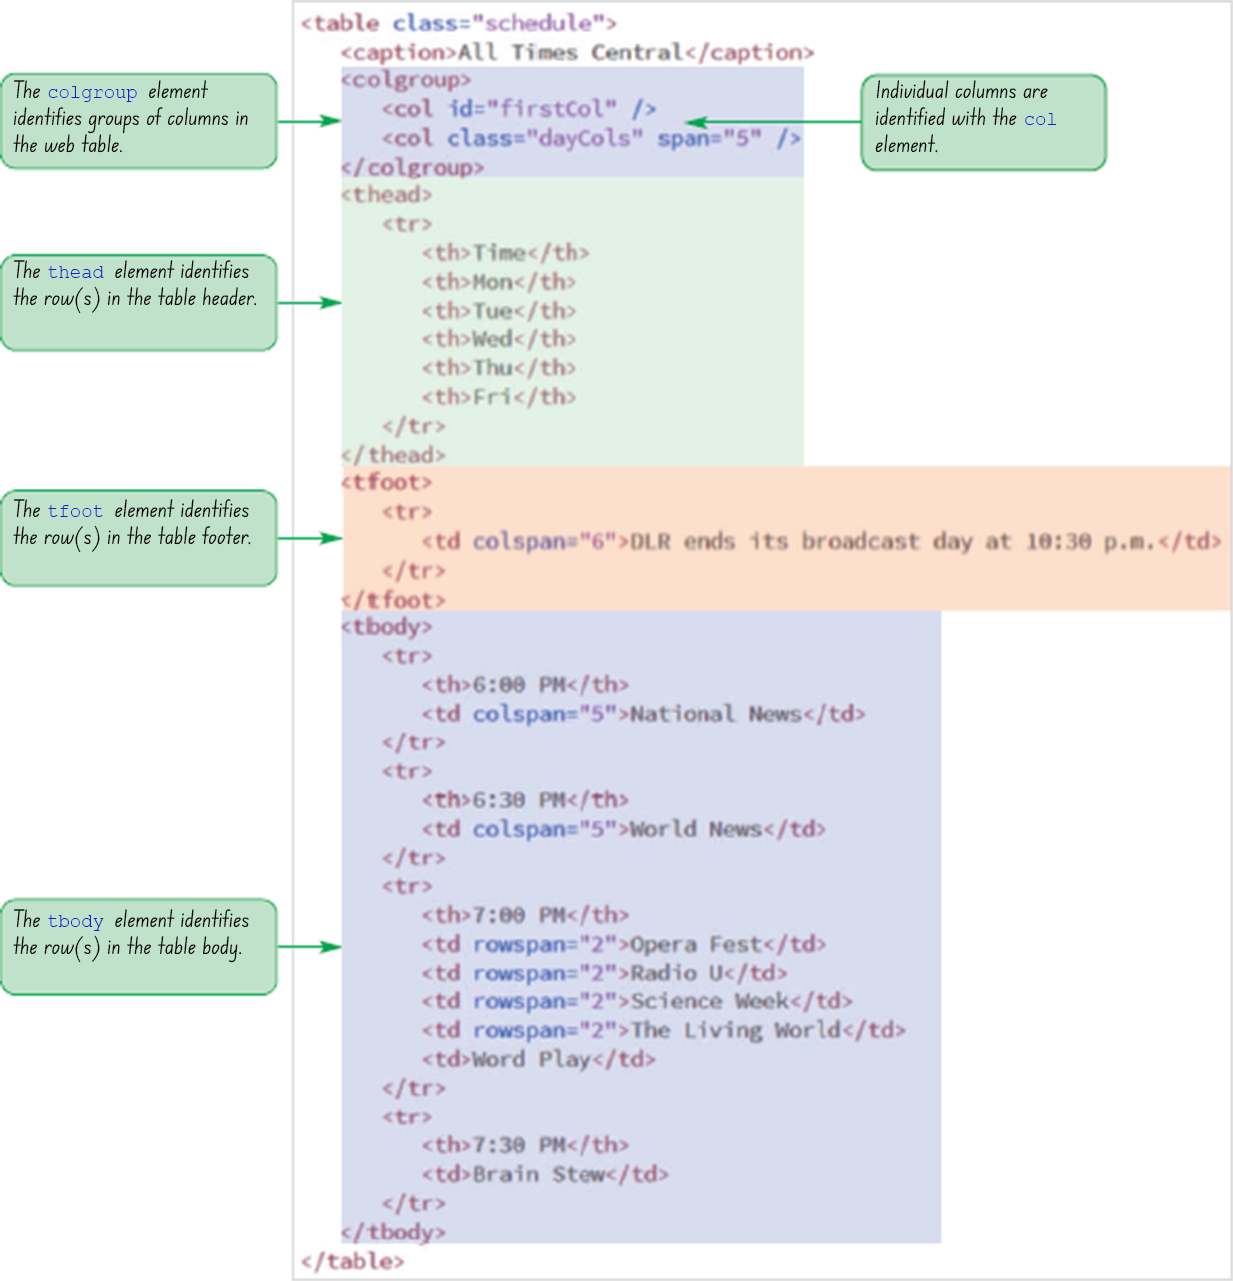
Figure 6-23 highlights the newly added code in the schedule table.
 
To format the table row groups:
  1. Return to the dlr_tables.css file in your editor.
  2. Go to the Row Group Styles section and add the following style rule to format the content of the table header row group:
    table.schedule thead {
        background: rgb(153, 0, 153);
        color: white;
    }
  3. Add the following style rule for the table footer row group:
    table.schedule tfoot {
        background: black;
        color: white;
    }
  4. Save your changes to the style sheet and then reopen the dlr_evenings.html file in your browser.
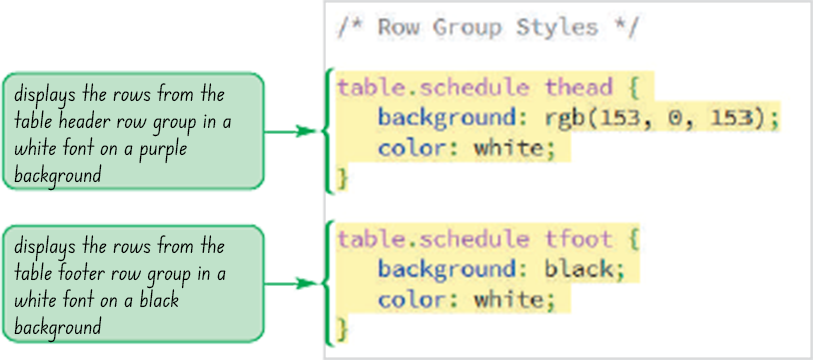
Figure 6-24 highlights the newly added style rules.
Figure 6-25 shows the new appearance of the web table with the formatted row groups.
 

Quick Quiz:

  1. True/False: The thead element must appear first, followed by the tbody element and finally the tfoot element.
    (Answer: False)
  2. True/False: A table can contain only one tbody element.
    (Answer: False)

Creating Column Groups

To define a column group:
  1. Return to the dlr_evenings.html file in your editor.
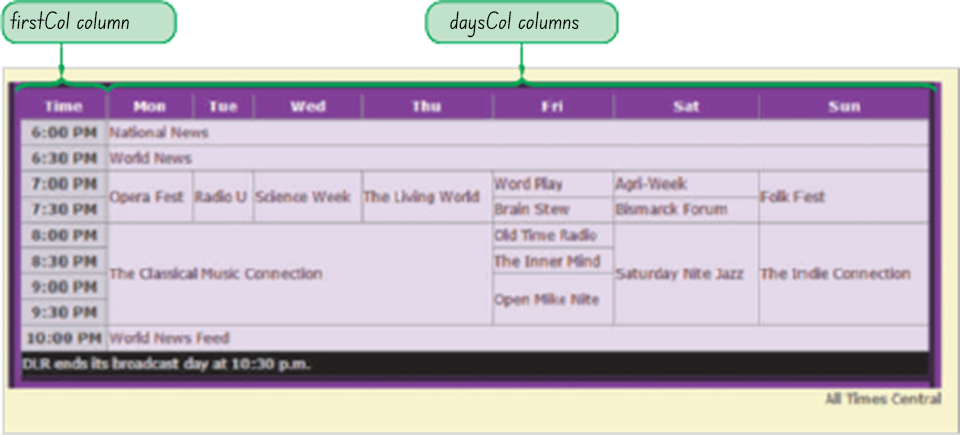
  2. Directly after the table caption, insert the following code to create a column group consisting of a first column with the ID firstcol followed by seven columns belonging to the dayCols class.
    <colgroup>
        <col id=”firstCol” />
        <col class=”dayCols” span=”7” />
    </colgroup>
  3. Save your changes to the file.
Figure 6-26 highlights the newly added style rules.
 
To format a column group:
  1. Return to the dlr_tables.css file in your editor.
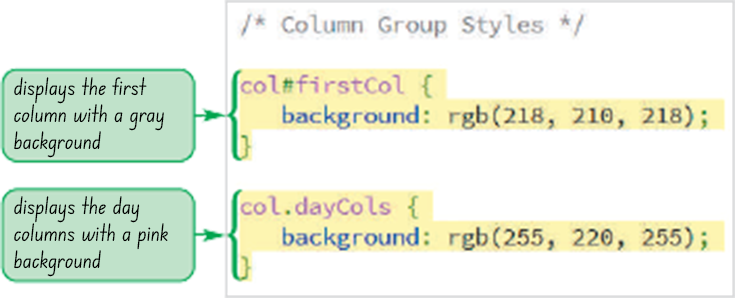
  2. Go to the Column Group Styles section and insert the following style rules to format the appearance of the schedule table columns:
    col#firstCol {
        background: rgb(218, 210, 218);
    }
    col.dayCols {
        background: rgb(255, 220, 255);
    }
  3. Save your changes to the file and then reload the dlr_evenings.htmls file in your browser.
Figure 6-27 highlights the style rules for the two column groups.
Figure 6-28 shows the appearance of the formatted columns.
 

Quick Quiz:

  1. True/False: In HTML, the colnum tag is used to mark table columns.
    (Answer: False)
  2. Fill in the blank: Individual columns can be identified by using the _____ attribute within the col element.
    (Answer: id)

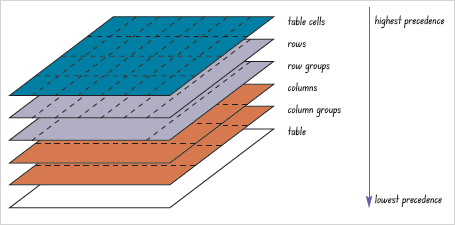
Exploring CSS Styles and Web Tables

  • Levels of precedence in the table styles in decreasing order
    • Table cells
    • Rows
    • Row groups
    • Columns
    • Column groups
    • Table

Working with Width and Height

To set the width of a column:
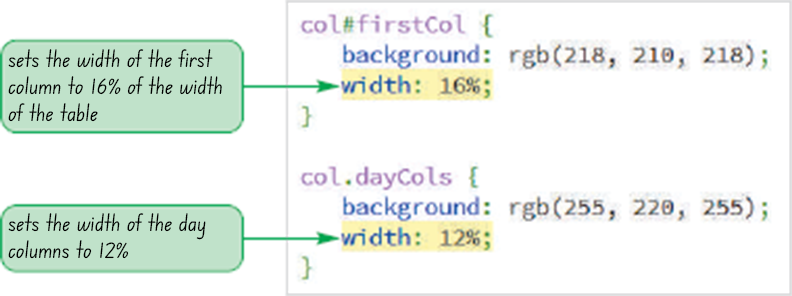
  1. Return to the dlr_tables.css file in your editor and go to the Column Group Styles section.
  2. Add the style width: 16%; to the style rule for the firstCol column.
  3. Add the style width: 12%; to the style rule for the columns of the dayCols class.
Figure 6-30 highlights the width styles for the two column selectors.
 
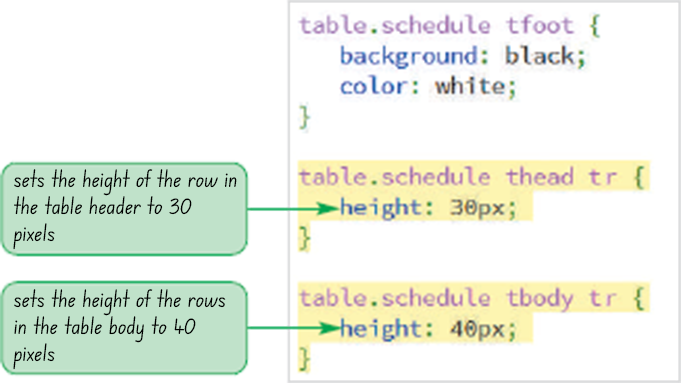
To set the height of the table rows:
  1. Scroll up to the Row Group Styles section.
  2. Add the following style rule to set the row height within the table header to 30 pixels:
    table.schedule thead tr {
        height: 30px;
    }
  3. Add the following style rule to set the row height in the table body to 40 pixels:
    table.schedule tbody tr {
        height: 40px;
    }
    Note that you don't apply the height property to the row groups themselves because that would set the height of the entire group and not the individual rows within the group.
  4. Save your changes to the file and then refresh the dlr_evenings.html file in your browser.
Figure 6-31 highlights the height styles for the table rows.
Figure 6-32 shows the revised appearance of the table with the resized columns and rows.
 
To set the width of a column:
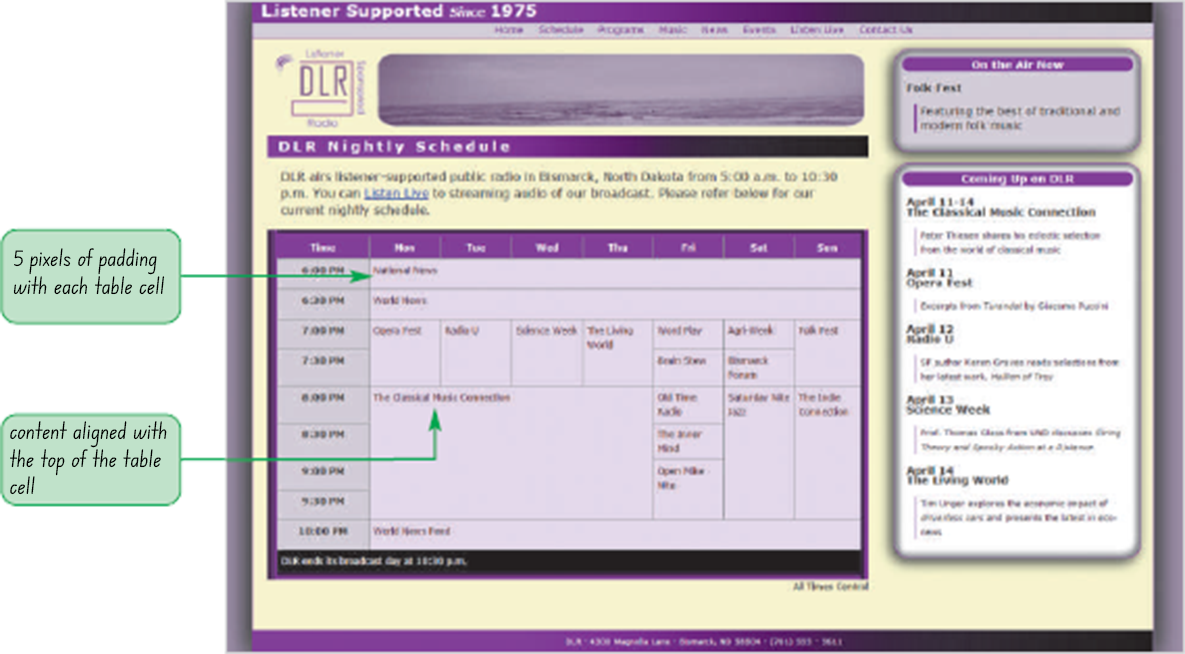
  1. Return to the dlr_tables.css file in your editor and go to the Table Cell Styles section.
  2. Add the following styles to the style rule for the header and data cells in the schedule table:
    padding: 5px;
    vertical-align: top;
  3. Close the file, saving your changes.
  4. Reload the dlr_evenings.html file in your browser.
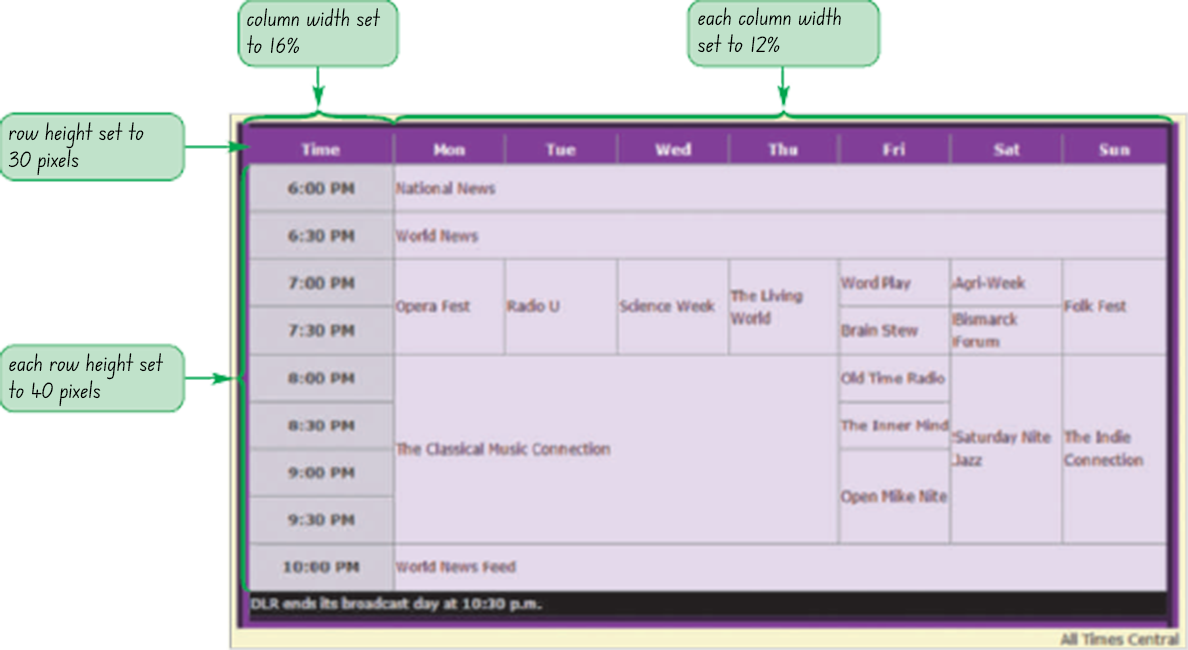
Figure 6-33 highlights the new styles in the style sheet.
Figure 6-34 shows the completed design of the nightly schedule page.

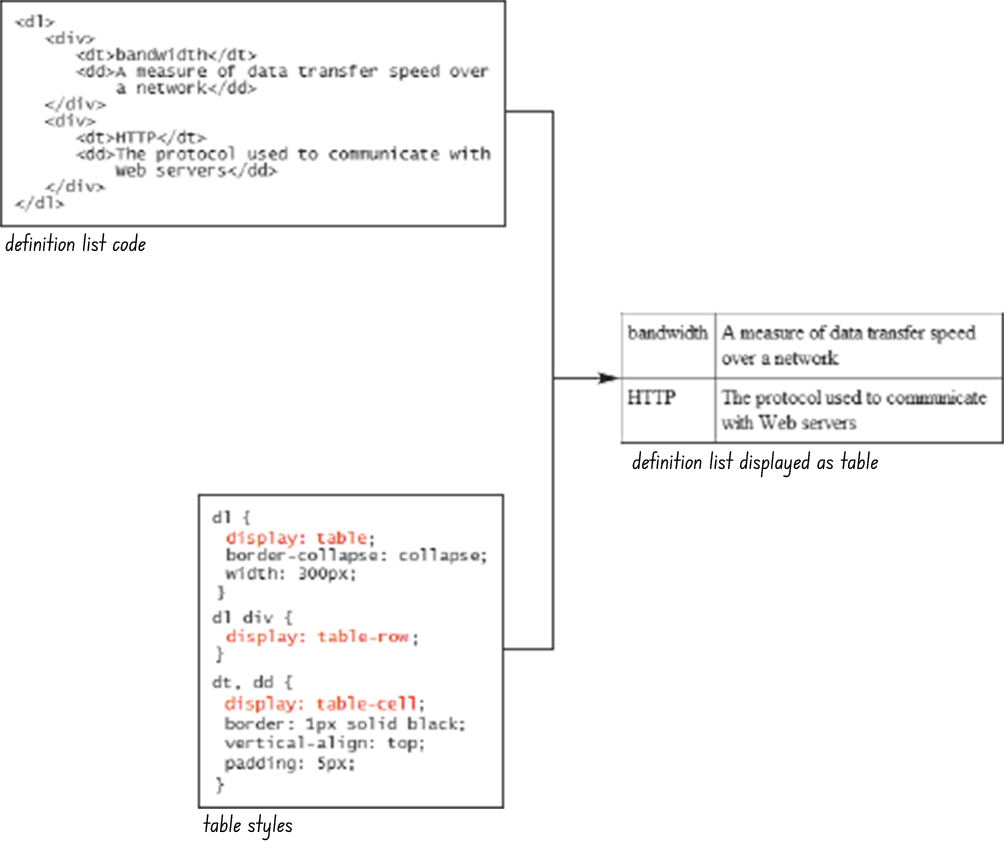
Applying Table Styles to Other Page Elements

Display Style Equivalent HTML Element
display: table; table (treated as a block-level element)
display: table-inline; table (treated as an inline element)
display: table-row; tr
display: table-row-group; tbody
display: table-header-group; thead
display: table-footer-group; tfoot
display: table-column; col
display: table-column-group; colgroup
display: table-cell; td or th
display: table-caption; caption

Internet activity:

Search the web and list down other styles that can be applied to a table.
 

Tables and Responsive Design

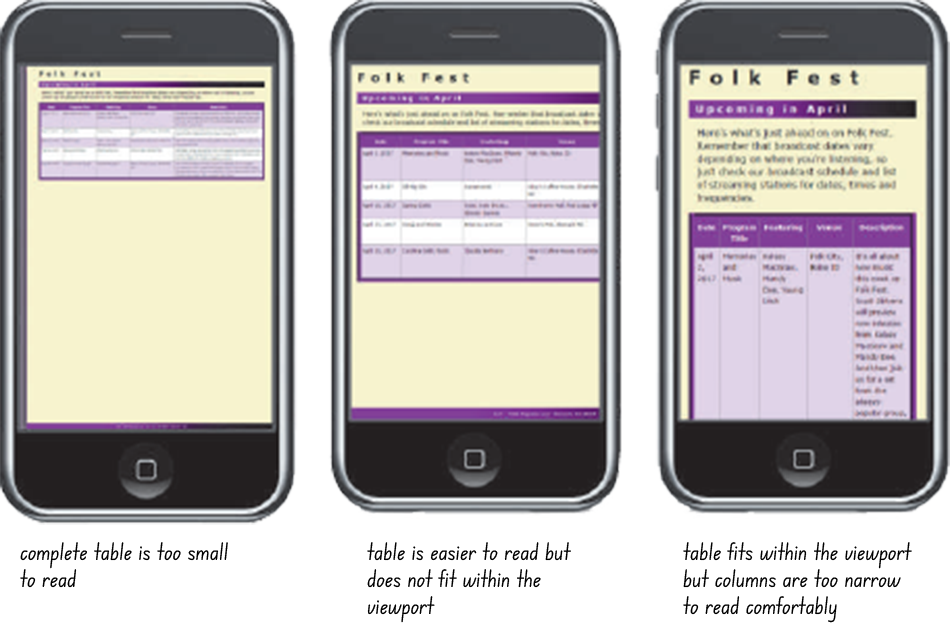
  • A new layout of table data for mobile screens is required
  • Several table columns are reduced to two:
    • One column containing all data labels
    • Second column containing data associated with each label
  • To create a responsive web table, add the text of data labels as attributes of all td elements in the table body
  • Store data labels using a data attribute
  • General format of a data attribute is
    data-text=“value”
    where text is the name of the data attribute and value is its value
  • Data attributes use names specific to the function it is used for
  • For example, the following code uses a data attribute named data-label to store the text of the labels associated with the data cell:
    <td data-label=“Date”>April 2, 	2017</td>
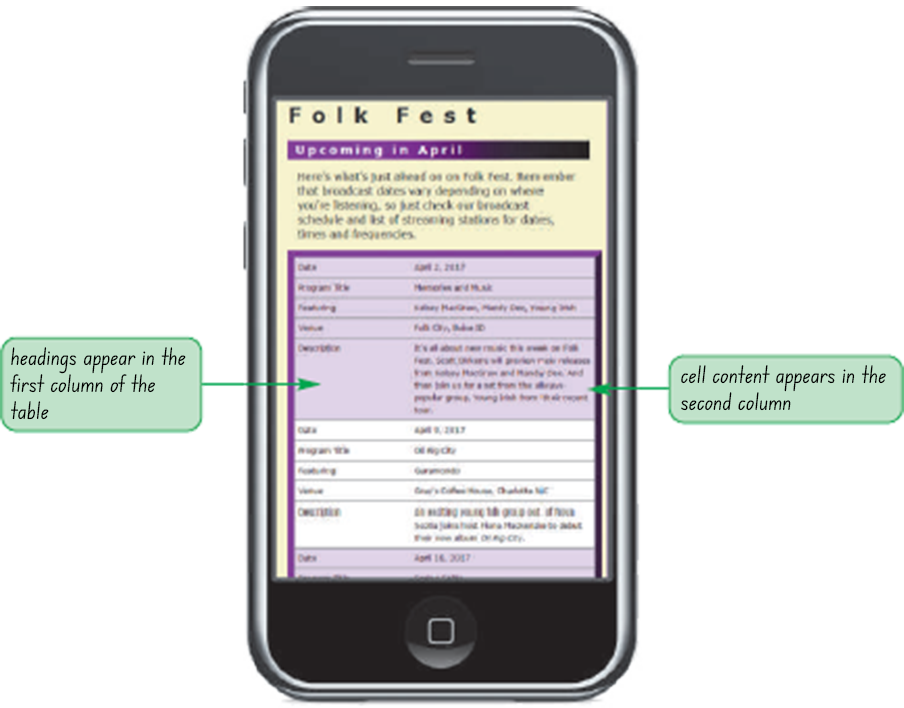
  • The result is a list of data cells that are aligned as block elements
  • Within each block element, the data label is followed by the data cell content
  • The goal is to transform table with multiple columns into two-column layout

Quick Quiz:

  1. True/False: CSS cannot be used to restructure a web table.
    (Answer: False)
  2. True/False: The data attribute, used to store data labels, was introduced in HTML4.
    (Answer: False)
 

Designing a Column Layout

Setting the Number of Columns

To view the episode page:
  1. Use your editor to open the dlr_lw0414_txt.html file from the html06 › tutorial folder. Enter your name and the date in the comment section of the file and save it as dlr_lw0414.html.
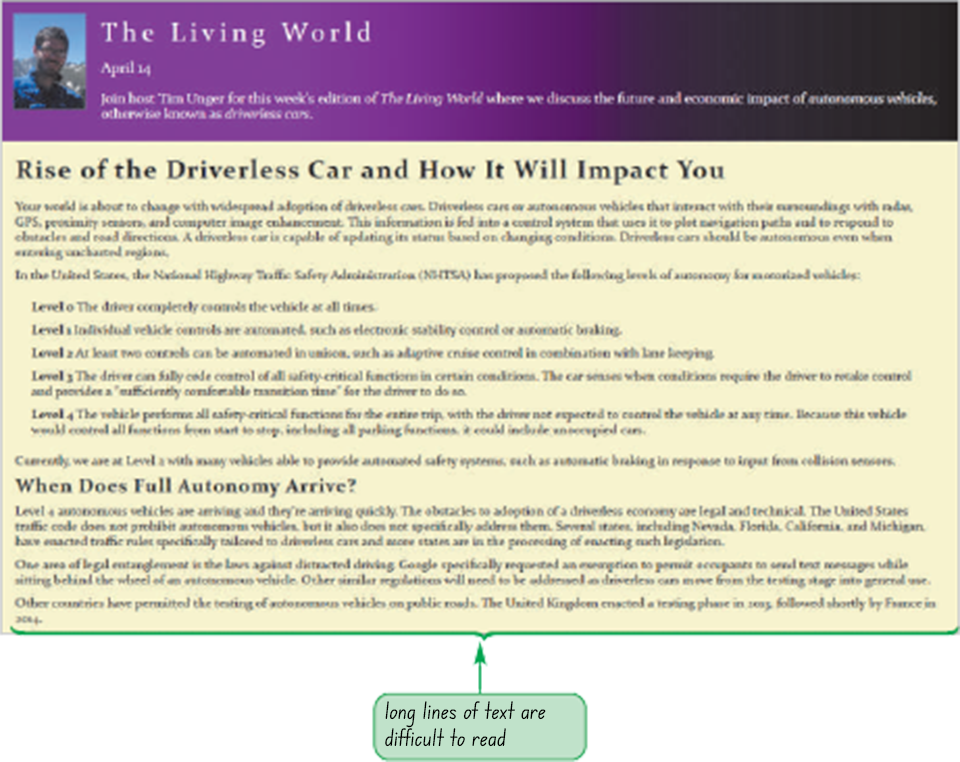
  2. Take some time to study the content and structure of the document.
  3. Use your browser to open the dlr_lw0414.html file.
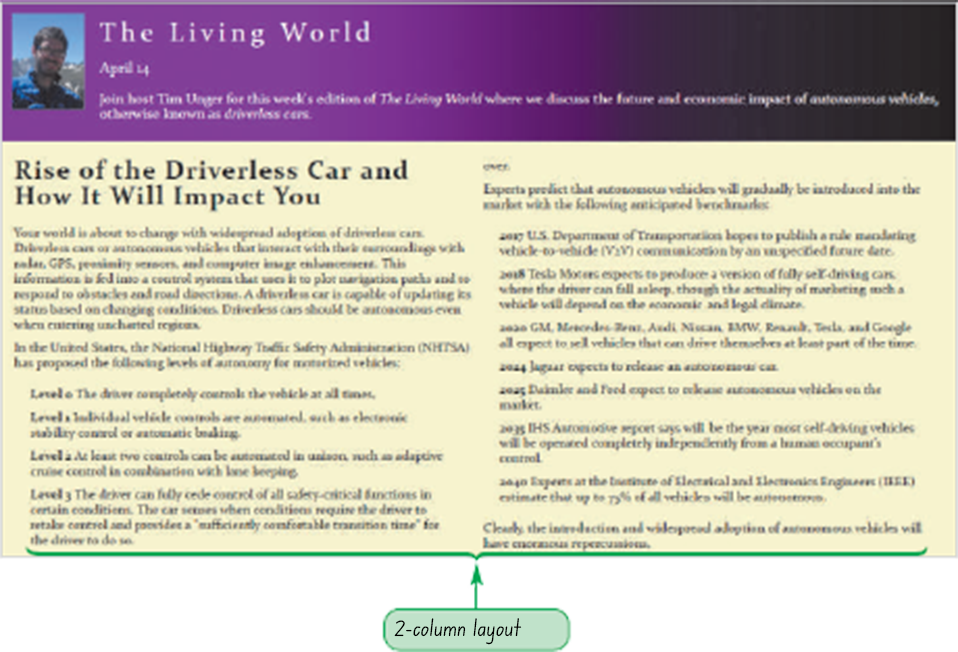
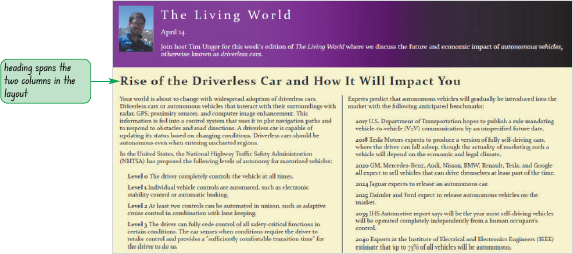
Figure 6-39 shows the current layout of the page article on a desktop device.
 
To apply a column layout:
  1. Use your editor to open the dlr_columns_txt.css file from the html06 › tutorial folder. Enter your name and the date in the comment section of the file and save it as dlr_columns.css.
  2. Within the Column Styles section, insert the following media query to create column layout for the article element for devices with a minimum screen width of 641 pixels.
    @media only screen and (min-width: 641px) {
        article {
            -moz-column-count: 2;
            -webkit-column-count: 2;
            column-count: 2;
        }
    }
  3. Save your changes to the file.
  4. Return to the dlr_lw0414.html file in your editor.
  5. Within the document head, add a link to the dlr_columns.css style sheet.
  6. Close the file, saving your changes.
  7. Reload the dlr_lw0414.html file in your browser.
Figure 6-40 highlights the media query in the style sheet.
Figure 6-41 shows the two column layout of the page article.
 

Defining Column Widths and Gaps

To set the column gap size:
  1. Return to the dlr_columns.css file in your editor.
  2. Within the style rule for the article element, add the following styles:
    -moz-column-gap: 30px;
    -webkit-column-gap: 30px;
    column-gap: 30px;
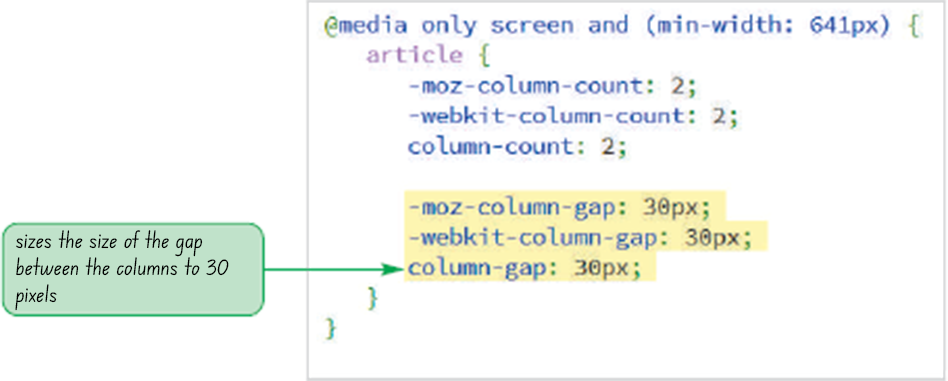
    Note that you include the browser extensions to provide cross-browser compatibility.
  3. Save your changes to the file and then reload dlr_lw0414.html in your browser. Verify that the gap between the two columns has increased from its default gap size.
Figure 6-42 highlights the new code in the style rule.
 
To create a column rule:
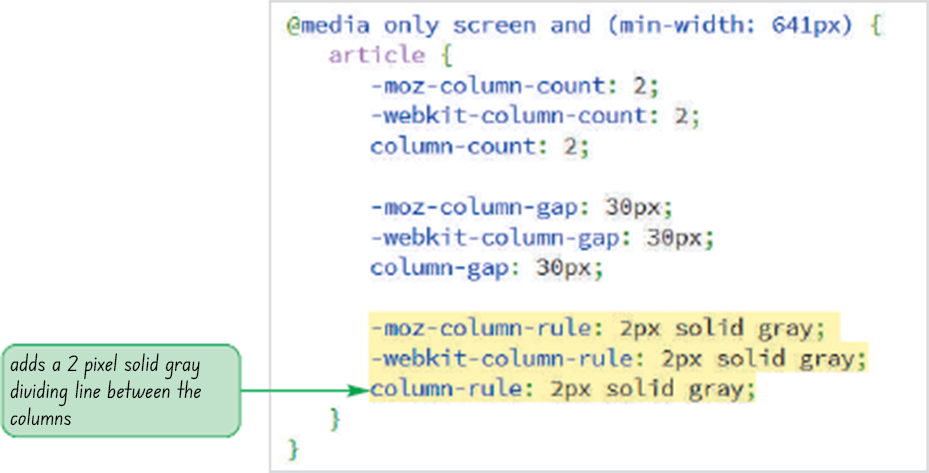
  1. Return to the dlr_columns.css file in your editor and within the style rule for the article element add the following styles:
    -moz-column-rule: 2px solid gray;
    -webkit-column-rule: 2px solid gray;
    column-rule: 2px solid gray;
  2. Save your changes to the file and then reload dlr_lw0414.html in your browser.
Figure 6-43 highlights the code to create the gray dividing line between the columns.
Figure 6-44 shows the revised appearance of the column layout.
 

Managing Column Breaks

To set the widows and orphans around the column breaks:
  1. Return to the dlr_columns.css file in your editor and add the following styles to the style rule for the article element:
    widows: 3;
    orphans: 3;
  2. Save your changes to the file and then reload the dlr_lw0414.html file in your browser. Verify that the widows and orphans around the column break in the article are at least three lines apiece.

    Trouble? At the time of this writing, some browsers, such as the Firefox desktop browser, do not support the orphans and widows style properties as applied to column breaks.

Figure 6-45 highlights the code to define the size of the widows and orphans.
 

Spanning Cell Columns

To create a column-spanning heading:
  1. Return to the dlr_columns.css file in your editor and, within the media query for desktop devices, add the following style rule for the h1 heading in the article element:
    article h1 {
        -moz-column-span: all;
        -webkit-column-span: all;
        column-span: all;
    }
  2. Save your changes to the file and then reload dlr_lw0414.html in your browser.

    Trouble? At the time of this writing, the column-span property is not supported by the Firefox browser.
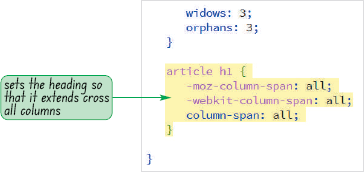
Figure 6-46 highlights the new style rule to create a column-spanning heading.
Figure 6-47 shows the final layout of page article.
 

Quick Quiz:

  1. True/False: By default, browsers create a gap of 5 cm between each column in HTML.
    (Answer: False)
  2. True/False: By default, the browsers break the content within a column layout in HTML.
    (Answer: True)
 
Session 6.2 Quick Check
  1. What are the three table row group elements and in what order should they be entered in the HTML code?
    The three row group elements are thead for the table header rows, tfoot for the table footer rows, and tbody for the table body rows. They should be entered in the order: thead, tfoot, and then tbody.
  2. Provide code to create a column group in which the first two columns belong to the introCol class and the next three columns belong to the col1, col2, and col3 classes respectively.
    <colgroup>
        <col span=”2” class=”introCol” />
        <col class=”col1” />
        <col class=”col2” />
        <col class=”col3” />
    </colgroup>
  3. Provide code to change the background color of the 2 columns belonging to the introCol class to yellow.
    col.introCol {
        background-color: yellow;
    }
  4. What are the only CSS properties that can be applied to columns and column groups?
    Columns and column groups accept only four CSS style properties: border, background, width, and visibility.
  5. In the case of conflicting styles, which has the higher precedence: the style of the row group or the style of the column group?
    The style of the row group.
  6. Provide a style to set the height of every table row in the table header to 25 pixels.
    table thead tr {
        height: 25px;
    }
  7. Provide the code to display an unordered list as a table, the list items as table rows, and hypertext links within each list as table cells.
    ul {display: table;}
    ul li {display: table-row;}
    ul li a {display: table-cell;}
  8. Provide code to display the content of all div elements in a column layout with the minimum width of each column set to 200 pixels. Use browser extensions in your code.
    div {
        -moz-column-width: 200px;
        -webkit-column-width: 200px;
        column-width: 200px;
    }
  9. In the style rule you created in the last question, how many columns would be displayed and what would be their widths when the parent element is 500- pixels wide? Assume a column gap of 20 pixels.
    There would be two columns each with a width of 240 pixels with a 20 pixel gap between them.
«Previous Lesson | Chapter Review »